>
Edit Content

Food That’s Made from the Heart
We’re all about turning simple ingredients into magical moments. From kitchen newbies to seasoned chefs, our recipes are designed to keep things fun and easy! Let’s cook, laugh, and eat together. 🥰

Contact Us

Discover the Best Seared Ahi Tuna Recipe

ahi tuna recipe -seared

What makes a perfect seared ahi tuna recipe? Is it the quality of the ahi tuna, the searing technique, or the flavors? To make a delicious seared ahi tuna, you need to know how to cook it right and master the searing technique. This article will guide you through making the best seared ahi tuna recipe.

Our easy-to-follow instructions and helpful tips will help you impress your friends and family. Whether you’re a seasoned chef or a beginner, this guide will teach you how to make a tasty ahi tuna recipe – seared to perfection. Our recipe is designed to highlight the unique flavors and textures of ahi tuna, perfect for seafood lovers.

Key Takeaways

  • Understanding the basics of cooking ahi tuna is crucial for creating a perfect seared ahi tuna recipe
  • Mastering the perfect searing technique is essential for bringing out the unique flavors and textures of ahi tuna
  • Using high-quality ahi tuna is vital for creating a delicious and mouthwatering seared ahi tuna dish
  • Combining flavors and ingredients is key to creating a unique and tasty seared ahi tuna recipe
  • Following easy-to-follow instructions and helpful tips can make a big difference in the outcome of your seared ahi tuna recipe
  • Practicing and experimenting with different techniques and ingredients can help you perfect your seared ahi tuna recipe

Understanding Ahi Tuna: Your Premium Seafood Choice

Ahi tuna is a prized seafood known for its rich flavor and firm texture. It’s perfect for searing or grilling. This makes it a top choice for sushi and seafood lovers.

To make a great seared ahi tuna recipe, start with fresh ingredients. Choose a high-quality ahi tuna steak. It should be rich in flavor and firm to the touch. Look for a deep red color and a meaty texture.

What Makes Ahi Tuna Special

Ahi tuna is special because of its high fat content. This makes it flavorful and tender. It also stays moist and juicy, even when cooked hot.

To enhance its flavors, pair it with soy sauce, ginger, and sesame seeds. These ingredients complement its taste beautifully.

Selecting the Perfect Ahi Tuna Steak

When picking an ahi tuna steak, consider a few things. Make sure it’s sashimi-grade, meaning it’s been frozen to kill parasites. Also, check the steak’s thickness, color, and texture.

Fresh vs. Frozen Ahi Tuna

Fresh and frozen ahi tuna have their own benefits. Fresh tuna is pricier but tastes better. Frozen tuna is cheaper and still tasty if thawed and cooked right.

For the best seared ahi tuna recipe, fresh tuna is usually preferred. But frozen tuna is a budget-friendly option that works well too.

Essential Ingredients for Seared Ahi Tuna Recipe

To make a tasty seared ahi tuna recipe with sesame, you need a few key ingredients. These are fresh ahi tuna steaks, sesame oil, soy sauce, and sesame seeds.

The quality of your ingredients is very important. Freshness is crucial for ahi tuna. Make sure to buy from a trusted supplier. Sesame oil and soy sauce bring a deep, savory taste. Sesame seeds add a crunchy texture and a nutty flavor.

With these ingredients, you can make a delicious and healthy seared ahi tuna recipe with sesame. It’s great for any time.

Kitchen Tools and Equipment You’ll Need

To make a tasty seared ahi tuna recipe, you need the right tools and equipment. A well-stocked kitchen makes cooking easier and helps you get the best results. The quality of your equipment is key when cooking ahi tuna.

For cooking ahi tuna, you’ll need a skillet or grill, a cutting board, and a sharp knife. These tools help you prepare and cook the tuna perfectly. Also, a thermometer is important to ensure the tuna is cooked safely.

Required Cookware

The cookware you use can change the flavor and texture of the ahi tuna. A skillet or grill with a non-stick surface is best for searing. This prevents the tuna from sticking and makes flipping easier.

A cast-iron or stainless steel skillet works well. They keep heat well and help create a nice crust on the tuna.

Optional but Helpful Tools

While not necessary, some tools can make cooking easier. A fish spatula is great for handling delicate fish like ahi tuna. It helps prevent the fish from breaking when flipping.

A plate warmer is also useful. It keeps the tuna warm while serving, which is important for a delicious seared ahi tuna recipe.

Mastering the Perfect Ahi Tuna Recipe – Seared to Perfection

To make a simple seared ahi tuna recipe, you need to know how to prepare and cook it right. Ahi tuna is a delicate fish. It needs gentle handling and precise cooking to enhance its flavors and textures.

Before cooking, pat the ahi tuna dry with a paper towel. This step is key to getting a crispy crust on the outside and a juicy inside. Next, heat a skillet over medium-high heat. Add a bit of oil to prevent the tuna from sticking.

Here are some tips for searing your ahi tuna:

  • Use a hot skillet to achieve a nice crust on the outside
  • Don’t overcook the tuna – it should be cooked for 2-3 minutes per side for medium-rare
  • Let the tuna rest for a few minutes before serving to allow the juices to redistribute

A simple seared ahi tuna recipe can be even better with a tasty sauce. Soy sauce, wasabi, and sesame oil are great choices. You can also add sliced veggies like bell peppers or carrots for color and texture.

By following these tips, you’ll make a simple seared ahi tuna recipe that will wow your guests. Always use fresh and high-quality ingredients. Don’t be afraid to try different seasonings and sauces to find your favorite.

IngredientQuantity
Ahi tuna steaks4
Soy sauce1/4 cup
Sesame oil2 tablespoons

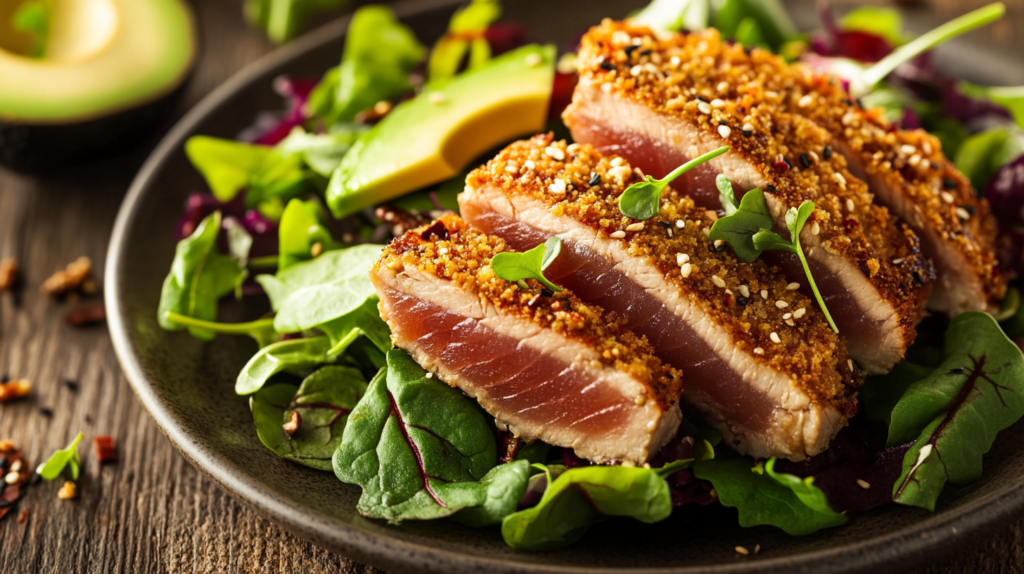
Preparing Your Signature Sesame Crust

To make your seared ahi tuna recipe stand out, a great sesame crust is key. It’s all about the right mix of flavors and textures. Choosing the right ingredients and applying them with care is crucial.

A sesame crust brings a nice crunch and a nutty taste to your seared ahi tuna recipe. First, pick the right sesame seeds. You can choose from white, black, or mix both for a unique taste and look.

Selecting the Perfect Sesame Seeds

White sesame seeds have a milder taste, while black ones are stronger and nuttier. Think about the flavor you want for your ahi tuna recipe -seared and pick your sesame seeds wisely.

Additional Coating Options

To make your sesame crust even better, try adding grated ginger, garlic powder, or chopped scallions. These can enhance the flavors of your seared ahi tuna recipe and give it a special taste.

By picking the right sesame seeds and adding other ingredients, you can make a signature sesame crust. It will take your ahi tuna recipe -seared to the next level. Don’t be afraid to try different mixes to find the perfect flavor for your dish.

Step-by-Step Searing Technique

To get the perfect sear on your best seared ahi tuna recipe, follow a simple technique. First, dry your ahi tuna steak well. This step is key to getting a crispy crust.

Then, heat a skillet over high heat and add a bit of oil. When the oil is hot, put the tuna steak in the pan. Sear it for 1-2 minutes on each side, depending on its thickness. Remember, don’t overcook it to keep it juicy and tender.

Here are some tips to keep in mind:

  • Use a thermometer to ensure the pan is at the right temperature.
  • Don’t overcrowd the pan, cook the tuna steaks one at a time if necessary.
  • Let the tuna rest for a minute or two before serving.

By following these steps and tips, you’ll make a delicious best seared ahi tuna recipe. It’s sure to impress everyone. And with these easy steps, you can make an easy seared ahi tuna recipe anytime.

Complementary Sauces and Accompaniments

A delicious seared ahi tuna recipe with sesame is not complete without a few complementary sauces and accompaniments. To enhance the flavor of your seared ahi tuna, consider serving it with a variety of Asian-inspired dipping sauces. These sauces can add a rich and savory flavor to your dish, making it a truly unforgettable experience.

Some popular options for dipping sauces include soy sauce, wasabi, and pickled ginger. These sauces can be served on the side, allowing each guest to choose their favorite flavor. For a more unique flavor, consider making your own delicious seared ahi tuna recipe with sesame and serving it with a side of wasabi mayo or soy sauce.

Asian-Inspired Dipping Sauces

  • Soy sauce: a classic choice for dipping seared ahi tuna
  • Wasabi: adds a spicy kick to your dish
  • Pickled ginger: provides a sweet and sour flavor

Side Dish Recommendations

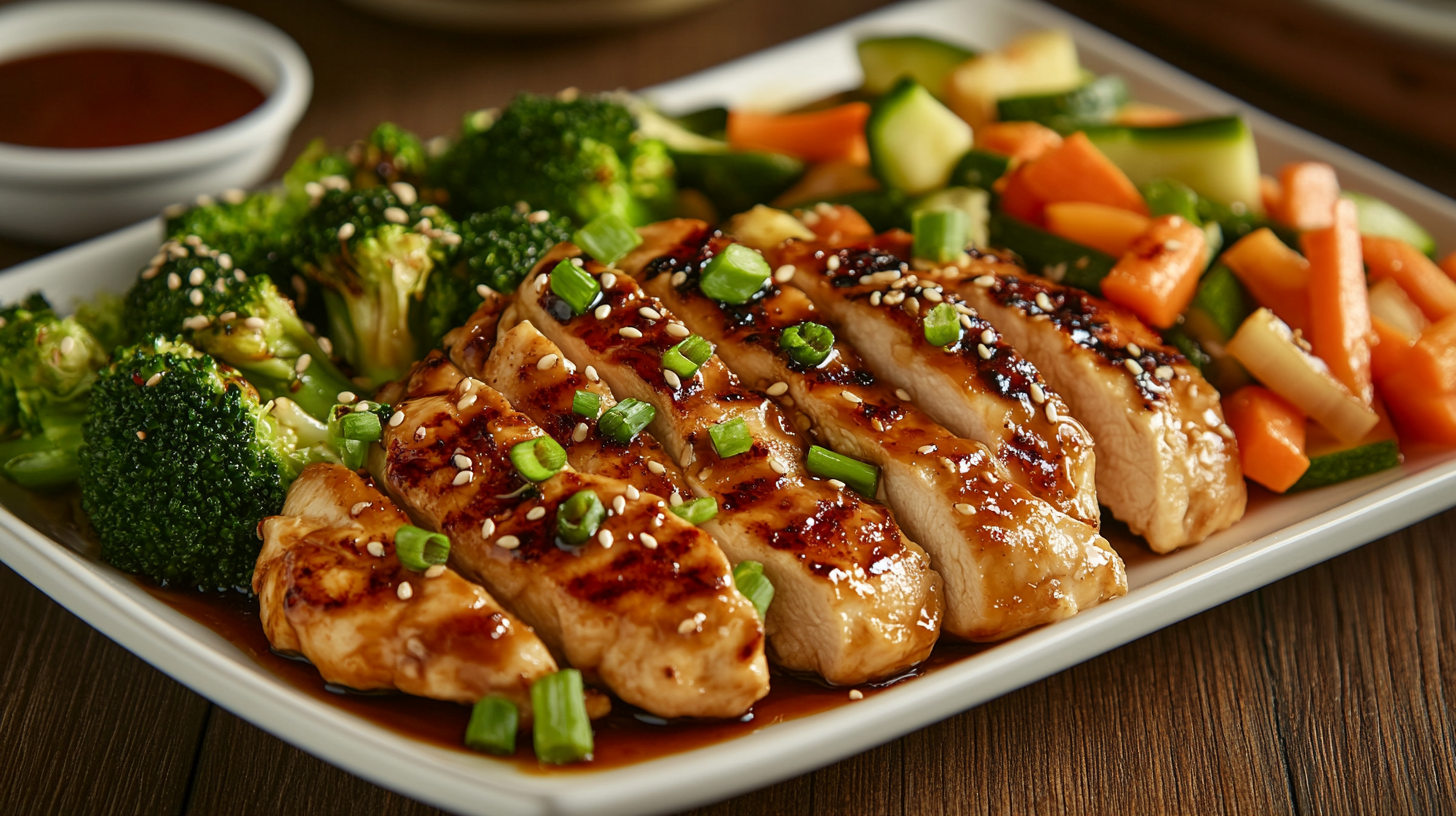
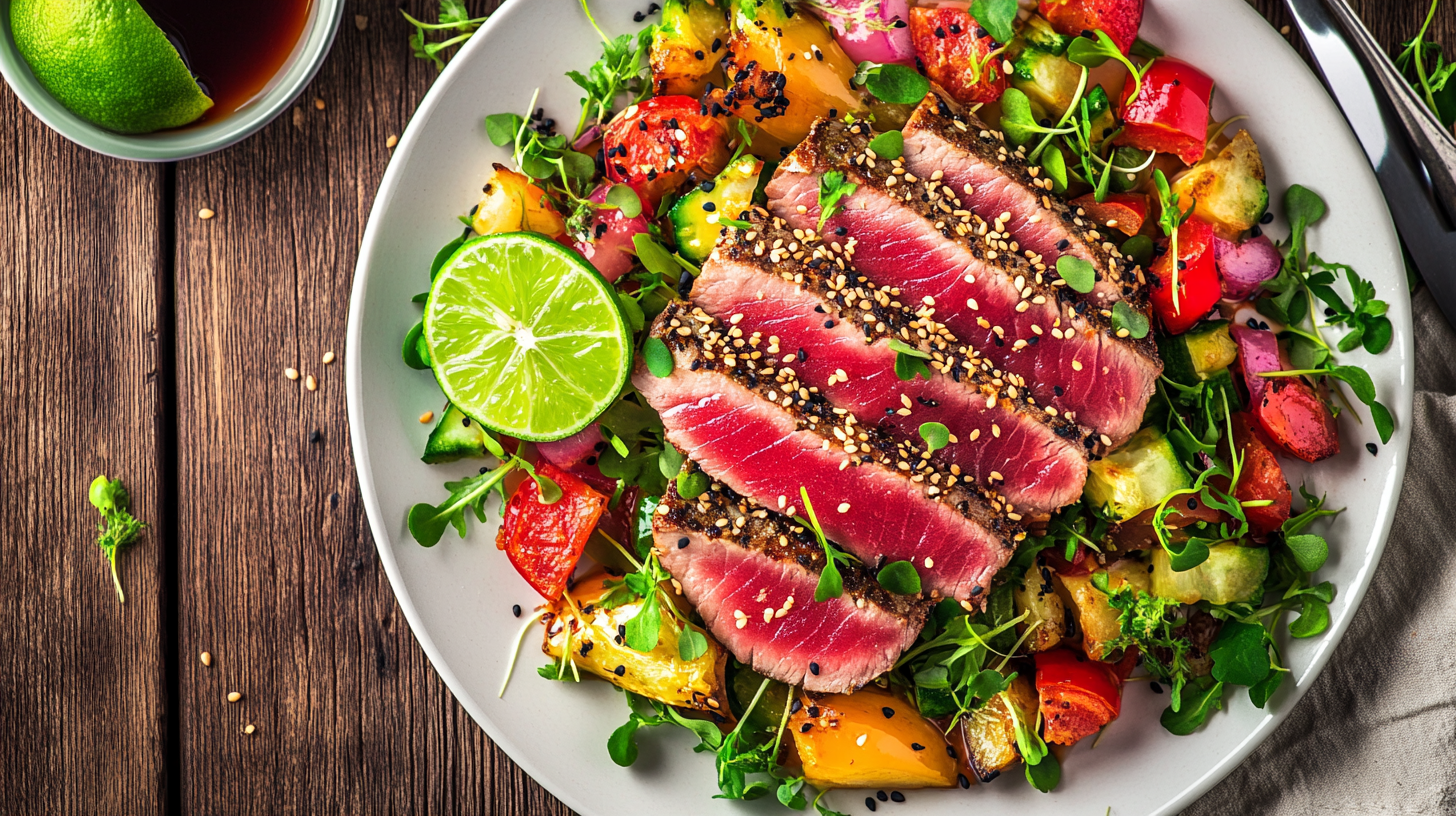
When it comes to side dishes, there are many options that pair well with seared ahi tuna. Some popular choices include steamed vegetables, such as asparagus or broccoli, and a side of rice. For a more filling meal, consider serving your seared ahi tuna with a side of roasted vegetables or a salad.

Plating Suggestions

To make your dish visually appealing, consider adding a few garnishes to your plate. Some popular options include sliced green onions, sesame seeds, and a sprinkle of soy sauce. By adding these simple touches, you can create a beautiful and delicious seared ahi tuna recipe with sesame that is sure to impress your guests.

SauceIngredientsInstructions
Soy SauceSoy sauce, water, sugarMix all ingredients together and serve
Wasabi MayoMayo, wasabi, soy sauceMix all ingredients together and serve

Storage and Leftover Guidelines

Storing and reheating your simple seared ahi tuna recipe is key. It keeps the dish safe and tasty. To store it, put it in an airtight container in the fridge. Make sure it stays at 40°F (4°C) or colder.

Freezing is another option for longer storage. Wrap it in plastic or foil, then in a freezer bag. To reheat, thaw it in the fridge overnight. Then, heat it to 145°F (63°C) before serving.

  • Use it in a salad with mixed greens, cherry tomatoes, and citrus vinaigrette
  • Make a tuna sandwich with toasted bread, lettuce, and tartar sauce
  • Add it to noodles or rice for a quick meal

By following these tips, you can enjoy your simple seared ahi tuna recipe for longer. It stays safe and delicious.

Conclusion: Perfecting Your Seared Ahi Tuna Experience

Learning to make seared ahi tuna at home is a fun journey. By following the tips in this article, you can make a dish that will wow everyone. Always pick the freshest ahi tuna and follow the searing steps for the best taste and texture.

Feel free to try out new seasonings and sauces to create your own unique taste. With a bit of practice, you’ll get better at making your ahi tuna recipe. Soon, you’ll enjoy a top-notch seafood meal right in your own kitchen.

FAQ

What makes ahi tuna a premium seafood choice?

Ahi tuna is top-notch because it tastes rich and feels firm. It’s a favorite in sushi and seafood dishes. It’s often seared or grilled.

How do I select the perfect ahi tuna steak?

Look for ahi tuna with a shiny look and a firm feel. Stay away from any signs of spoilage. Choose between fresh or frozen, each with its own perks.

What are the essential ingredients for a seared ahi tuna recipe?

You’ll need fresh ahi tuna, sesame oil, soy sauce, and sesame seeds. A skillet or grill is needed for searing. You’ll also need a cutting board and knife for prep.

What kitchen tools and equipment do I need to cook a perfect seared ahi tuna?

You’ll need a skillet or grill, a cutting board, a knife, and a thermometer. Optional tools like a fish spatula and plate warmer can be helpful.

How do I prepare a signature sesame crust for my ahi tuna?

Choose the right sesame seeds and mix the crust ingredients. Apply the crust to the tuna. Try different coatings and seasonings for unique flavors.

What’s the step-by-step process for searing ahi tuna?

Prepare the tuna, heat the skillet, and sear it perfectly. Cook to the right temperature and serve with a tasty sauce.

What complementary sauces and accompaniments can I serve with seared ahi tuna?

Serve with Asian-inspired sauces like soy sauce, wasabi, and pickled ginger. Add steamed veggies and rice. Try different plating ideas.

How should I store and reheat leftover seared ahi tuna?

Refrigerate for up to 3 days or freeze for up to 3 months. Reheat to the right temperature for safety and flavor.

Savory Sausage and Cabbage Recipes for Your Next Dinner

sausage and cabbage recipes

What makes a perfect sausage and cabbage recipe? Is it the flavors, the ease of making it, or the health benefits? We’ve got you covered with our tasty sausage and cabbage recipes. You’ll find easy and healthy options, as well as creative twists. These recipes will wow your family and friends.

Key Takeaways

  • Discover a variety of sausage and cabbage recipes for your next dinner
  • Learn how to make easy sausage cabbage recipes that are quick and delicious
  • Explore healthy cabbage and sausage dishes that are perfect for a nutritious meal
  • Get inspired by innovative twists on classic sausage and cabbage combinations
  • Find the perfect recipe to impress your family and friends with your culinary skills
  • Enjoy a range of flavors and textures with our collection of sausage and cabbage recipes

The Rich History of Sausage and Cabbage Combinations

Sausage and cabbage are staples in many cuisines, especially in Europe and America. This duo has a long history, with cultures around the world making their own versions. From delicious sausage and cabbage meals to sausage and cabbage skillet recipes, there’s endless variety.

Traditional European recipes often feature the best sausage and cabbage combinations. German dishes are known for their bold flavors and large portions. Irish cuisine, on the other hand, focuses on slow-cooked stews and braises. These differences add to the diversity of sausage and cabbage recipes, making them popular worldwide.

European Origins and Traditions

In Europe, sausage and cabbage are key ingredients in many dishes. Some well-known examples are:

  • Bigos, a Polish hunter’s stew with sausage, cabbage, and sauerkraut
  • Colcannon, an Irish side dish of mashed potatoes, kale or cabbage, and sausage
  • Cassoulet, a French casserole with sausage, cabbage, and white beans

American Adaptations

In the United States, sausage and cabbage recipes have been adapted to local tastes. Some popular American dishes include:

  • Sausage and cabbage skillet recipes, often with smoked sausage and crispy cabbage
  • Cabbage and sausage soup, a hearty dish for cold winter nights
  • Grilled sausage and cabbage, a simple yet tasty combo for outdoor barbecues

These American twists on traditional recipes have enriched the history of sausage and cabbage combinations. They offer a fresh take on European classics.

Essential Ingredients for Perfect Sausage and Cabbage Dishes

To make authentic sausage and cabbage dishes, you need the right ingredients. Choose high-quality sausage made with wholesome ingredients. Pick fresh, crisp cabbage heads without blemishes.

Some key ingredients for homemade sausage and cabbage ideas are:

  • Fresh cabbage, such as green or red cabbage
  • High-quality sausage, such as smoked or fresh sausage
  • Aromatics, such as onions and garlic
  • Herbs and spices, such as caraway seeds and black pepper

Think about the flavor you want when picking ingredients. For a traditional authentic sausage and cabbage dish, use smoked sausage and caraway seeds. For something new, try fresh sausage and different herbs and spices.

Using top-notch ingredients and thinking about flavor helps you make tasty authentic sausage and cabbage dishes. Whether you’re making a classic recipe or something new, the right ingredients are key. They make your dish flavorful and satisfying.

IngredientDescription
SausageHigh-quality sausage, such as smoked or fresh sausage
CabbageFresh, crisp heads of cabbage, such as green or red cabbage
AromaticsOnions, garlic, and other aromatics that add flavor to the dish
Herbs and SpicesCaraway seeds, black pepper, and other herbs and spices that add flavor to the dish

Classic Sausage and Cabbage Recipes Everyone Should Know

There are many sausage and cabbage recipes out there. But some stand out for their simplicity and flavor. We’ll look at some classic recipes that are perfect for any time.

These recipes are great for both beginners and experienced cooks. They offer a tasty meal that’s quick to make. Whether you want a one-pot dish, a slow cooker recipe, or a skillet-fried option, we’ve got you covered.

One-Pot Sausage and Cabbage

This recipe is a favorite among sausage and cabbage fans. It’s simple and needs just a few ingredients. Brown the sausage, add cabbage and seasonings, and simmer until the cabbage is tender.

Slow Cooker Version

For a quick meal, try the slow cooker version. Just put all the ingredients in the slow cooker and cook on low for a few hours. You’ll get a tender sausage and cabbage dish perfect for a weeknight dinner.

Skillet-Fried Variation

If you want a crispy dish, try the skillet-fried version. Cook the sausage and cabbage in a skillet with oil and seasonings. Serve it hot for a delicious meal.

These classic recipes will become favorites in your kitchen. They’re easy, tasty, and great for any occasion. So, why not try them and enjoy the flavors of sausage and cabbage?

Quick and Easy Weeknight Sausage Cabbage Meals

It’s tough to make a healthy meal on busy weeknights. But, with the right ingredients, you can whip up healthy cabbage and sausage dishes fast. These meals are great for a quick dinner because they can be made in many ways, like stir-fries or skillet dinners.

Here are some tasty ideas for delicious sausage and cabbage meals:

  • Sausage and cabbage stir-fry with your favorite seasonings
  • Skillet dinner with sausage, cabbage, and potatoes
  • Sausage and cabbage soup with crusty bread

These meals are not only yummy but also healthy. They can be made quickly. Adding healthy cabbage and sausage dishes to your meals means you and your family will get the nutrients you need to stay healthy and full of energy.

Here’s a simple recipe to start with:

IngredientQuantity
Sausage1 pound
Cabbage1 head
Potatoes2-3
Seasoningsto taste

Selecting the Best Sausage Types for Cabbage Dishes

Choosing the right sausage is key to making great sausage and cabbage dishes. The type of sausage you pick should match the cabbage’s flavor and texture.

Popular choices include smoked sausage, fresh sausage, and specialty sausages like knockwurst or bratwurst. Smoked sausage brings a deep, savory taste. Fresh sausage offers a lighter flavor. Specialty sausages add a special touch to your dish.

Here are some things to think about when picking the best sausage for your cabbage dish:

  • Flavor profile: Pick a sausage that goes well with the cabbage and other ingredients.
  • Texture: Think about how the sausage’s texture will mix with the cabbage.
  • Authenticity: Go for a sausage that’s often used in sausage and cabbage dishes, like smoked or fresh sausage.

Choosing the right sausage can make your sausage and cabbage dishes both tasty and authentic. Whether you want a classic mix or something new, the right sausage can elevate your dish.

Sausage TypeFlavor ProfileTexture
Smoked SausageRich, savoryFirm
Fresh SausageDelicate, slightly sweetSoft
Specialty SausageVaries depending on typeVaries depending on type

Mastering Cabbage Preparation Techniques

To make tasty sausage and cabbage recipes, you need to know how to prepare cabbage. Cabbage can be used in many ways, like shredding, chopping, sautéing, or braising. Shredding is especially good because it brings out cabbage’s natural sweetness.

Here are some tips for preparing cabbage for homemade sausage and cabbage ideas:

  • Choose fresh cabbage with crisp leaves
  • Remove the tough outer leaves
  • Shred or chop the cabbage into desired sizes

Pairing cabbage with sausage is a great idea. Try out different sausage and cabbage recipes to see how versatile they are. With practice, you’ll get better at making tasty sausage and cabbage dishes.

Mastering cabbage preparation and trying out homemade sausage and cabbage ideas opens up a world of flavors. So, get creative and start cooking with cabbage and sausage today!

Health Benefits of Combining Sausage and Cabbage

Combining sausage and cabbage offers many health benefits. It can boost your immune system and support healthy digestion. Healthy cabbage and sausage dishes are great for a balanced diet. For more ideas, check out manorearecipes.

A balanced meal with sausage and cabbage is possible. Sausage is a good protein source, and cabbage is full of vitamins and fiber. Knowing their nutritional values is key.

Nutritional Profile

It’s important to know the nutritional values of sausage and cabbage. Sausage can have 200 to 500 calories per serving, depending on the type and cooking. Cabbage, however, is low in calories but packed with nutrients.

Dietary Considerations

When making healthy sausage and cabbage dishes, think about dietary needs. Choosing low-sodium sausage or using herbs for flavor is good for those with high blood pressure. This way, you can make tasty meals that fit different diets.

Tips for Enhancing Flavor and Texture

To make your sausage and cabbage dishes even better, focus on flavor and texture. The key is to find the right mix of flavors and textures. Using the best sausage and cabbage combinations is a great way to do this.

Seasoning Guidelines

Seasoning is crucial. Use the right amount of salt, pepper, and herbs and spices. Here are some tips:

  • Use fresh herbs like parsley, thyme, and rosemary to add flavor to your sausage and cabbage dishes.
  • Don’t overdo it with the salt and pepper – a pinch will do.
  • Experiment with different spice blends to find the one that works best for you.

Cooking Time Recommendations

Cooking time is important for the perfect texture. Here are some tips:

  • Cook your sausage and cabbage dishes over medium heat to prevent burning.
  • Use a thermometer to ensure the sausage is cooked to a safe internal temperature.
  • Don’t overcook the cabbage – it should be tender but still crisp.

By following these tips, you’ll make delicious sausage and cabbage dishes. Remember to try different seasonings and cooking times. This will help you find the best sausage and cabbage combinations for you.

Sausage TypeCooking TimeSeasoning
Smoked Sausage10-15 minutesSalt, pepper, and paprika
Fresh Sausage15-20 minutesSalt, pepper, and parsley
Specialty Sausage20-25 minutesSalt, pepper, and thyme

Common Cooking Mistakes to Avoid

When making sausage and cabbage recipes, knowing common mistakes is key. One big error is overcooking the sausage, making it dry and tough. To fix this, cook the sausage until it’s browned and still juicy.

Another mistake is underseasoning the cabbage, leading to a bland dish. To fix this, season the cabbage with salt, pepper, and caraway seeds. Adding fresh lemon juice can also enhance its sweetness.

  • Cook the sausage over medium-high heat for a nice crust.
  • Use various spices and herbs for depth and complexity.
  • Don’t overcook the cabbage to avoid it becoming mushy.

By avoiding these mistakes, you can make tasty sausage and cabbage recipes for any event.

Conclusion: Making the Most of Your Sausage and Cabbage Creations

The mix of sausage and cabbage opens up a world of tasty dishes. From classic European recipes to fresh American twists, these simple ingredients can turn into many homemade sausage and cabbage ideas. These dishes are both cozy and creative.

Now that you know about key ingredients, cooking methods, and ways to add flavor, you’re ready to make the most of your sausage and cabbage creations. Try out different sausages, check out local recipes, and let your imagination run wild. Create delicious sausage and cabbage meals that will be favorites in your home.

Cooking is all about exploring and finding new things. So, dive into the world of sausage and cabbage. Let your love for tasty, healthy food lead you on your cooking journey. Bon appétit!

FAQ

What are some classic sausage and cabbage recipes?

Classic recipes include one-pot sausage and cabbage, slow cooker versions, and skillet-fried dishes. These are hearty, comforting, and simple to make.

What are the best types of sausage to use for cabbage dishes?

Best sausages for cabbage dishes are smoked, fresh, and specialty varieties. The right sausage can change the flavor and texture of your dish.

How can I prepare cabbage for sausage and cabbage recipes?

You can shred, chop, sauté, or braise cabbage. Learning these methods can enhance the cabbage’s sweetness and pair well with sausage.

What are the health benefits of combining sausage and cabbage?

Sausage and cabbage together boost your immune system and aid digestion. They offer a healthy and tasty meal when cooked right.

How can I enhance the flavor and texture of my sausage and cabbage dishes?

To improve flavor and texture, follow seasoning and cooking time tips. This will highlight the natural tastes and textures of the ingredients.

What are some common cooking mistakes to avoid when making sausage and cabbage dishes?

Avoid overcooking, underseasoning, and other mistakes that can ruin your dish. Being aware of these can help you make tasty sausage and cabbage meals easily.

Easy Potato Sausage Recipe for a Satisfying Dinner

potato sausage recipe

What makes a perfect potato sausage recipe? It’s the mix of savory sausage and tender potatoes. This combo creates a meal that’s both tasty and comforting. Can you make this perfect dish with a simple recipe?

Introduction to Easy Potato Sausage Recipe

Making homemade potato sausage is a great way to enjoy a meal with loved ones. The best part is, it’s easy to make. You only need a few ingredients and a bit of effort. This recipe is perfect for those who want to try something new without spending hours cooking.

Key Takeaways

  • Easy potato sausage recipe is perfect for a satisfying dinner
  • Homemade potato sausage can be made with minimal ingredients and effort
  • Savory sausage and tender potatoes are the key to a delicious potato sausage dish
  • A simple potato sausage recipe can be customized to suit your taste preferences
  • Easy potato sausage recipe is great for beginners and experienced cooks alike
  • Homemade potato sausage is a great way to enjoy a comforting and flavorful meal

The History Behind Traditional Potato Sausage

Potato sausage has a rich history that spans continents. It started in European cuisine. The idea of mixing potatoes with sausage meat is a key part of many dishes, like the delicious potato sausage dish loved by many. To really enjoy the authentic potato sausage recipe, knowing its history is key.

European immigrants first brought potato sausage to the United States. Over time, the recipe changed, using local ingredients and cooking methods. This created a unique potato sausage casserole that’s both tasty and filling.

Origins in European Cuisine

In Europe, sausage has been a mainstay for centuries. Each country has its own sausage-making traditions. Adding potatoes to sausage meat was a smart move, making it more affordable for everyone.

Evolution in American Cooking

In the United States, potato sausage is a hit, especially in areas with European roots. The authentic potato sausage recipe has been tweaked to include local flavors like smoked paprika and garlic. This gives it a unique taste.

Cultural Significance

Potato sausage has greatly influenced many cultures’ food scenes. It’s a dish that brings people together, whether at family gatherings or community events. The delicious potato sausage dish is a big part of many celebrations. Its authentic potato sausage recipe is often passed down through generations.

Essential Ingredients for the Perfect Potato Sausage Recipe

To make a tasty quick potato sausage meal, you need the right stuff. The key to a great potato sausage recipe is the quality of its parts. Choose a sausage that’s full of flavor and has a nice texture. For a savory potato sausage skillet, smoked sausage or something similar works well.

Here are the main ingredients you’ll need:

  • Potatoes: Go for high-starch potatoes like Russet or Idaho for the best taste.
  • Sausage: Pick a sausage that goes well with potatoes, like smoked sausage or chorizo.
  • Spices: Onion, garlic, and paprika are must-haves for a rich flavor.
  • Herbs: Fresh or dried herbs like parsley, thyme, or rosemary can really boost the taste.

Adding bell peppers, onions, and mushrooms can make the dish even better. For a quick potato sausage meal, use pre-cooked sausage and frozen veggies to save time. Remember, a pinch of salt and pepper can make all the difference in a savory potato sausage skillet.

With these ingredients, you can whip up a delicious quick potato sausage meal or a hearty savory potato sausage skillet. It’s sure to please your taste buds.

Kitchen Tools and Equipment You’ll Need

To make a tasty classic potato sausage bake or skillet, you need the right tools. Having everything ready makes cooking easier. A well-stocked kitchen is key for any home cook.

You’ll need a large skillet, a cutting board, and knives for basic utensils. These help prepare your potato sausage recipe. For a bake, a baking dish is also useful. Optional tools like a food processor or stand mixer can make cooking simpler.

Essential Utensils

  • Large skillet
  • Cutting board
  • Set of knives

Optional Equipment

  • Food processor
  • Stand mixer

Preparation Surface Requirements

A clean, stable surface is vital for preparing your dish. Ensure you have enough space to chop, slice, and mix. With the right tools, you can make a delicious potato sausage bake or skillet that everyone will love.

Step-by-Step Potato Sausage Preparation Guide

To make a tasty potato sausage recipe, start by getting your ingredients ready. You’ll need ground meat, diced potatoes, and your favorite seasonings. Then, mix everything together in a big bowl until it’s just combined.

Here’s a quick guide on how to do it:

  • Combine ground meat, potatoes, and seasonings in a bowl
  • Mix the ingredients until just combined
  • Stuff the mixture into sausage casings
  • Cook the sausages using your preferred method

For an easy potato sausage recipe, use a food processor. It can chop the potatoes and mix the ingredients for you. Just remember, don’t overmix. It can make the sausages dense and tough.

By following these steps, you can make a delicious potato sausage recipe. It’s great for any meal. Whether you want an easy potato sausage recipe or something more complex, use quality ingredients and keep it simple.

Cooking Methods and Techniques

There are many ways to cook homemade potato sausage, each with its own advantages. Knowing these methods helps you pick the best one for you. For a tasty potato sausage casserole, you can use any of the following methods.

Stovetop Method

Cooking homemade potato sausage on the stovetop gives a crispy outside and a juicy inside. Just heat a pan with oil, add the sausage, and cook until it’s browned on all sides.

Oven-Baked Version

Baking homemade potato sausage in the oven is a healthier choice. It’s less greasy than frying. Place the sausage on a baking sheet and bake at 375°F for about 20 minutes, or until it’s cooked through.

Slow Cooker Alternative

Cooking homemade potato sausage in a slow cooker makes it tender and flavorful. Just put the sausage in the slow cooker, add your favorite ingredients, and cook on low for several hours.

For a tasty potato sausage casserole, use any of these methods. Add your favorite ingredients, like potatoes, cheese, and vegetables.

Choosing the right cooking method makes your homemade potato sausage dish even better. Whether you prefer stovetop, oven-baked, or slow cooker, a hearty potato sausage casserole is always a hit.

Flavor Variations and Seasonings

To make a delicious potato sausage dish, try different flavors and seasonings. An authentic potato sausage recipe gets better with herbs and spices. Think paprika, garlic powder, and onion powder.

Some tasty variations include:

  • Smoked paprika for a smoky taste
  • Chopped fresh herbs, like parsley or chives, for freshness
  • Spicy peppers, such as jalapenos or habaneros, for a spicy kick

A good authentic potato sausage recipe can be made to fit your taste. It’s a fun dish to make. By trying out different flavors and seasonings, you can make a delicious potato sausage dish that everyone will love.

“The key to a great potato sausage is to balance the flavors and textures, creating a harmonious and satisfying dish.”

With a bit of creativity and trying new things, you can make your own special authentic potato sausage recipe. It will show off the rich tastes and textures of this favorite dish.

Common Mistakes to Avoid When Making Potato Sausage

When making a quick potato sausage meal, knowing common mistakes is key. Temperature control is crucial. It can make or break your dish’s flavor and texture.

It’s also important to get the ingredient proportions right. Too much or too little of something can mess up the flavors. Finding the right balance is essential for a tasty dish.

Temperature Control Issues

Temperature problems can lead to undercooked or overcooked sausage. This can ruin your dish. Always check the cooking surface’s temperature and adjust the heat as needed.

Ingredient Proportions

Getting the right mix of ingredients is vital for flavor. Use a recipe as a guide but feel free to tweak it. The goal is to find the perfect flavor balance.

By avoiding these mistakes, you can make a delicious savory potato sausage skillet. With practice, you’ll soon be making quick potato sausage meals like a pro.

Serving Suggestions and Side Dishes

There are many ways to serve homemade potato sausage. A classic potato sausage bake is a favorite, with mashed potatoes, veggies, and a crispy top. Or, try a flavorful potato sausage skillet with bell peppers, onions, and a bit of spice.

For a traditional taste, serve your potato sausage with roasted vegetables or sauteed greens. You can also pair it with a simple salad or a hearty soup. The goal is to mix flavors and textures that match the rich taste of the sausage.

  • Grilled or roasted vegetables, such as asparagus or Brussels sprouts
  • A side of warm, crusty bread or cornbread
  • A fresh green salad with a light vinaigrette

By trying different sides, you can make a meal that’s both filling and flavorful. It’s a great way to enjoy your homemade potato sausage.

Storage and Reheating Tips

To keep your homemade potato sausage fresh, store it right. You can keep it in the fridge for up to 3 days. Or, freeze it for up to 2 months.

When you reheat your potato sausage casserole, do it safely. This prevents foodborne illness. You can reheat it in the microwave or oven until it’s hot and steaming.

  • Refrigerate or freeze the sausage immediately after cooking
  • Use airtight containers or freezer bags to prevent moisture and other flavors from affecting the sausage
  • Label and date the containers or bags so you can easily keep track of how long they’ve been stored

By following these tips, you can enjoy your homemade potato sausage and potato sausage casserole for longer. They’ll stay flavorful and textured.

Conclusion: Mastering Your Homemade Potato Sausage

Creating the perfect homemade potato sausage recipe is a fun journey. By following our guide and trying different cooking methods, you’re getting closer to being a pro. The secret to success is to try new easy potato sausage recipe ideas and find what you like best.

Feel free to mix up your seasonings and ingredients. The charm of an authentic potato sausage recipe is that you can make it your own. You can make it savory, spicy, or even smoky. The choices are endless for your homemade potato sausage.

Keep improving your skills and share your favorite recipes with others. By doing this, you’ll encourage friends and family to try making their own homemade potato sausage. Enjoy the process and happy cooking!

FAQ

What is the history behind traditional potato sausage?

Potato sausage comes from European cuisine, where it was a common dish. It became popular in America too, with each place adding its own twist. This dish shows the traditions and tastes of different areas.

What are the essential ingredients for the perfect potato sausage recipe?

For a tasty potato sausage, you need savory sausage, tender potatoes, onions, garlic, and spices. Mixing these ingredients right can make a dish that’s both flavorful and filling.

What kitchen tools and equipment are needed to make potato sausage?

To make potato sausage, you’ll need a sharp knife, cutting board, skillet or saucepan, and a spatula or wooden spoon. You might also need a baking dish, slow cooker, or other tools depending on how you cook it.

What are the different cooking methods for preparing potato sausage?

You can cook potato sausage on the stovetop, in the oven, or in a slow cooker. Each method gives different results, so you can pick what you like best.

How can I add different flavors to my potato sausage?

Try adding herbs, spices, and other ingredients to change up your potato sausage’s flavor. You can use classic seasonings or go for something bolder like smoked paprika or chili powder. The choices are endless for making your dish unique.

What are some common mistakes to avoid when making potato sausage?

Avoid mistakes like not controlling the temperature, using the wrong amounts of ingredients, and timing issues. Paying attention to these can help your potato sausage turn out perfectly every time.

What are some good side dishes and serving suggestions for potato sausage?

Traditional sides for potato sausage include mashed potatoes, roasted veggies, and sauerkraut. But you can also try new things like fresh salads, roasted Brussels sprouts, or crusty bread.

How can I properly store and reheat leftover potato sausage?

Store leftover potato sausage in an airtight container in the fridge for 3-4 days or freeze it for longer. When reheating, use the stovetop, oven, or microwave. Make sure it’s hot all the way through without drying out or getting too hard.

Savory Sausage Green Bean Potato Casserole

sausage green bean potato casserole

What makes a perfect weeknight dinner? It’s the mix of savory sausage, green beans, and potatoes in a tasty casserole. Or is it how easy it is to make? The answer is the sausage green bean potato casserole. It’s a hearty dish perfect for family dinners.

This casserole is great for a weeknight meal. It’s easy to prepare and can be made ahead of time. The mix of sausage, green beans, and potatoes makes a comforting meal. It’s sure to be a hit with your family, thanks to its simple recipe.

Key Takeaways

  • The sausage green bean potato casserole is a hearty one-pot wonder perfect for a family dinner.
  • This casserole is an easy dinner idea that can be prepared in advance.
  • The combination of sausage, green beans, and potatoes creates a delicious and comforting meal.
  • The casserole recipe is simple and easy to follow.
  • This dish is perfect for a weeknight dinner.
  • The sausage green bean potato casserole is a great option for a family looking for a comforting meal.

Why This Sausage Green Bean Potato Casserole Will Become Your Family’s Favorite

This sausage green bean potato casserole is a family-friendly dish perfect for a cold winter’s night. It’s a hearty, comforting meal that will become a staple in your home. The mix of savory sausage, tender green beans, and fluffy potatoes is a perfect combination.

This casserole is also a budget-friendly meal solution. The ingredients are affordable, and it can feed a large family. It’s a great option for saving money without losing flavor. Plus, it’s a one-pot meal, ready in under an hour, perfect for busy families.

Comfort Food at Its Finest

The casserole is made with love and care, using only the freshest ingredients. Every bite is filled with flavor and warmth. It’s the perfect meal for a chilly evening, loved by both kids and adults.

Budget-Friendly Meal Solution

The casserole is an excellent choice for those on a budget. The ingredients are affordable, and it can feed a large family. It’s a great option for saving money without sacrificing flavor.

Time-Saving One-Pot Convenience

The casserole is a one-pot meal, ready in under an hour. This makes it perfect for busy families who want a delicious, home-cooked meal without spending too much time in the kitchen.

Essential Ingredients for the Perfect Casserole

To make a delicious casserole, picking the right ingredients is key. A hearty meal like sausage green bean potato casserole needs a mix of flavors and textures. Make sure to choose fresh and high-quality ingredients for your casserole recipe.

Some important ingredients to think about include:

  • Sausage: Choose a type that goes well with the other flavors in your dish
  • Green beans: Pick fresh, frozen, or canned, depending on what you prefer
  • Potatoes: Go for a type that keeps its shape, like Russet or Yukon Gold
  • Spices and seasonings: Add herbs and spices to make your hearty meal even tastier

A well-made casserole recipe can become a favorite in your home. It offers a delicious casserole for any time. By picking the right ingredients and following a simple casserole recipe, you’ll make a hearty meal everyone will love.

The secret to a great casserole recipe is finding the right balance among ingredients. Try different mixes to find the perfect taste for your delicious casserole.

IngredientQuantityNotes
Sausage1 poundChoose a variety that suits your taste
Green beans2 cupsFresh, frozen, or canned
Potatoes3-4 mediumSelect a type that holds its shape well

Choosing the Right Sausage for Your Casserole

Choosing the right sausage is key to a tasty sausage green bean potato casserole. This dish is great for a weeknight dinner. The right sausage can make it a hit. Think about the flavor you want in your casserole.

A key factor in choosing the right sausage is to think about the other ingredients in your casserole. For a classic sausage green bean potato casserole, you may want to opt for a more traditional sausage flavor. Some popular options include:

  • Italian sausage, which adds a nice spicy kick
  • Mild sausage, which is great for those who prefer a more subtle flavor
  • Chorizo, which adds a smoky, slightly sweet flavor

When cooking your sausage, be sure to cook it to perfection to bring out the full flavor. This will help to elevate your entire casserole and make it a truly enjoyable easy dinner idea for your family. With the right sausage and a little bit of know-how, you can create a weeknight dinner that’s both delicious and satisfying.

Italian Sausage Options

Italian sausage is a popular choice for sausage green bean potato casserole, and for good reason. It adds a nice spicy kick and a lot of flavor to the dish. When choosing an Italian sausage, consider the level of heat you prefer and opt for a mild or spicy variety accordingly.

Potato Selection and Preparation Tips

Choosing the right potatoes is key to a tasty casserole. For a dish like a savory sausage green bean potato casserole, picking the best potatoes is crucial. Potato selection greatly impacts the taste and texture of your comfort food.

Here are some tips for preparing the perfect potatoes for your casserole:

  • Look for high-quality potatoes that are firm and have no signs of sprouting or greenish tint.
  • Go for Russet, Yukon Gold, or red potatoes. They have a sweet flavor and a fluffy texture.
  • Peel and dice the potatoes into uniform pieces for even cooking.

Cooking the potatoes right is also important. You can boil or bake them until they’re tender. Then, dice them into smaller pieces for your casserole. By following these tips, you’ll make a delicious casserole that’s perfect for any time.

Potato TypeCharacteristicsSuitability
RussetHigh starch content, fluffy textureBest for baking, mashing
Yukon GoldButtery, yellow flesh, sweet flavorExcellent for boiling, roasting
RedWaxy texture, sweet flavorIdeal for salads, grilling

By picking the right potatoes and preparing them well, you’ll make a satisfying dish. It’s perfect for any occasion and will become a favorite comfort food.

Green Bean Guide: Fresh vs. Frozen vs. Canned

Choosing the right green beans is key for a tasty one-pot meal. They’re great in many dishes, like casseroles. We’ll look at the different types and how to prepare them.

Green beans come in fresh, frozen, and canned forms. Each has its own benefits. Fresh green beans offer the best taste and texture. Frozen green beans are a good choice when fresh ones are out of season.

Preparing Green Beans

To start, trim the ends and cut green beans to size. Fresh ones can be steamed or sautéed with garlic and lemon. Frozen green beans follow package instructions. Canned green beans need their liquid drained before adding to your dish.

Here are some tips for preparing green beans:

  • Trim the ends of fresh green beans to prevent toughness
  • Cook frozen green beans according to the package instructions
  • Drain the liquid from canned green beans before adding them to the dish

By using these tips and choosing the right green beans, you can make a tasty dinner. Whether you pick fresh, frozen, or canned, your meal will be both flavorful and healthy.

Type of Green BeanPreparation MethodCooking Time
FreshSteaming or sautéing5-7 minutes
FrozenCooking according to package instructions3-5 minutes
CannedDraining liquid and adding to dish0 minutes

Step-by-Step Cooking Instructions

To make a tasty casserole for dinner, start by heating your oven to 375°F (190°C). Cook the sausage in a large skillet over medium-high heat. Break it up into small pieces as it cooks.

After the sausage is done, set it aside. Prepare the potatoes and green beans. You can find many casserole recipes online. For this one, slice the potatoes thinly and steam the green beans until tender.

Now, let’s put the casserole together. In a large bowl, mix the cooked sausage, potatoes, and green beans. Add your favorite seasonings and mix well. Put the mixture in a 9×13 inch baking dish.

Top it with cheese and breadcrumbs. Bake in the preheated oven for 30-40 minutes. The top should be golden brown, and the casserole hot and bubbly.

A delicious casserole is perfect for a weeknight dinner. It’s easy to make and ready in under an hour. Remember to use the right baking dish size, don’t overmix, and let it rest before serving.

By following these steps and tips, you’ll make a tasty casserole. It’s great for a quick dinner or a special occasion. This casserole recipe is sure to be a hit with your family.

Making Ahead and Storage Options

This family-friendly dish is not only delicious but also convenient to make ahead and store. It’s perfect for busy days when you need an easy dinner idea. You can prepare the casserole up to a day in advance and refrigerate it overnight.

When it comes to freezing, it’s essential to follow some guidelines. This ensures the casserole remains fresh and flavorful. Here are some tips:

  • Let the casserole cool completely before freezing to prevent the formation of ice crystals.
  • Divide the casserole into individual portions or freeze the entire dish, depending on your needs.
  • Label and date the frozen casserole, and store it in the freezer for up to 3 months.

To reheat the frozen casserole, thaw it overnight in the refrigerator. Then, bake it in the oven at 350°F (180°C) for about 25-30 minutes, or until heated through. You can also reheat it in the microwave, but be careful not to overheat. This can affect the texture and flavor of the dish.

Storage MethodStorage Duration
RefrigeratorUp to 3 days
FreezerUp to 3 months

Flavor Variations and Seasoning Suggestions

To make your sausage green bean potato casserole even better, try new flavors and seasonings. Adding herbs, spices, and cheeses can enhance the taste of the sausage and green beans. For a richer flavor, add garlic, onion, and bell peppers.

Think about adding Italian or Mexican flavors. You could use dried oregano and basil for an Italian twist, or cumin and chili powder for a Mexican touch. Greek flavors, with feta cheese and kalamata olives, are also great. The goal is to find the perfect mix of flavors for your taste.

Here are some seasoning ideas to start with:

  • Italian seasoning: oregano, basil, thyme
  • Mexican seasoning: cumin, chili powder, paprika
  • Greek seasoning: feta cheese, kalamata olives, lemon zest

The beauty of a sausage green bean potato casserole is its versatility. Feel free to experiment with different flavors. This way, you can create a dish that your family will enjoy.

Serving Suggestions and Side Dish Pairings

There are many ways to serve the sausage green bean potato casserole. It’s great for a family dinner and can be paired with various sides. For a quick meal, try it with a green salad or garlic bread.

Here are some side dish ideas that go well with the casserole:

  • Roasted vegetables, such as broccoli or Brussels sprouts
  • Mashed sweet potatoes or creamy coleslaw
  • A side of warm, crusty bread or cornbread

To make the dish more elegant, add fresh herbs like parsley or thyme. You can also sprinkle shredded cheese or breadcrumbs on top. This dish will quickly become a family favorite. With these ideas, you’ll have many options for easy dinners and family meals.

Here is a table with some popular side dish options:

Side DishDescription
Green SaladA simple mix of greens, vegetables, and dressing
Garlic BreadWarm, crusty bread infused with garlic butter
Roasted VegetablesA variety of vegetables roasted to perfection

Troubleshooting Common Casserole Issues

Making a delicious casserole for a weeknight dinner can sometimes go wrong. Issues like overcooking, undercooking, or uneven cooking can happen. Knowing how to fix these problems is key to a perfect casserole.

The texture of a casserole is very important. If it’s too dry, adding more liquid can help. But if it’s too soggy, reducing liquid or adding breadcrumbs can fix it. Getting the moisture just right is essential for a tasty casserole.

Common Texture Problems

  • Overcooking: This can cause the casserole to become dry and unappetizing.
  • Undercooking: This can result in a casserole that’s not fully cooked, which can be a food safety issue.
  • Uneven cooking: This can occur when some parts of the casserole are overcooked while others are undercooked.

To avoid these issues, carefully follow the casserole recipe. Adjust the seasoning as needed. Add salt, pepper, and herbs to taste. By fixing common casserole problems, you can make a weeknight dinner that everyone will enjoy.

Conclusion: Mastering Your Homemade Casserole Creation

Creating the perfect sausage green bean potato casserole is an art. With a bit of practice, you can master it. Follow the expert tips and techniques in this guide to get started.

Don’t be afraid to try different sausages, green beans, and potatoes. This will help you find your unique casserole. The most important thing is to use high-quality ingredients. Cook it until it’s golden brown.

With a little creativity, your homemade casserole will be a hit. It will become a favorite in your home. So, get cooking and enjoy the process of creating something delicious.

FAQ

What is a sausage green bean potato casserole?

A sausage green bean potato casserole is a hearty dish. It combines savory sausage, fresh green beans, and tender potatoes. It’s a comforting meal perfect for a weeknight dinner.

Why is this casserole a great option for a family dinner?

This casserole is great for family dinners for many reasons. It’s a comfort food classic that everyone loves. It’s also budget-friendly and can feed a lot of people. Plus, it’s easy to make, saving time for busy families.

What are the essential ingredients needed to make this casserole?

To make the perfect casserole, you need sausage, green beans, potatoes, and spices. The quality of these ingredients greatly affects the taste and texture. Choose the best ones you can find.

How do I choose the right sausage for the casserole?

You have many sausage options for your casserole. Italian sausage, both spicy and mild, works well. You can also try turkey or chicken sausage to match your taste.

How do I prepare the potatoes and green beans for the casserole?

For the potatoes and green beans, follow a few tips. Use different types of potatoes, like Russet or Yukon Gold. Peel, dice, and cook them well. For green beans, use fresh, frozen, or canned. Trim, cut, and cook them right to blend with the other ingredients.

Can I make this casserole ahead of time?

Yes, you can make this casserole ahead of time. It’s perfect for freezing or refrigerating and reheating later. Just remember to store and reheat it correctly for the best taste.

How can I customize the flavor of this casserole?

You can customize the casserole’s flavor in many ways. Try different seasonings, herbs, spices, and cheeses. You can also experiment with different recipes, like Italian or Mexican, to match your taste.

What are some good side dish options to serve with this casserole?

This casserole is great as a main dish or side. Try salads, roasted vegetables, or fresh bread as sides. You can also add garnishes like herbs, cheese, or breadcrumbs for extra flavor and look.

What are some common issues that can arise when making a casserole, and how can I troubleshoot them?

Issues like texture problems, moisture imbalances, and seasoning can happen. To fix these, adjust cooking time, add liquid or starches, and try different seasonings. This will help you get the perfect flavor and texture.

Savor Paula Deen’s Classic Green Bean Casserole

paula deen green bean casserole​

What makes Paula Deen’s green bean casserole a staple in Southern cooking? How can you bring this comfort food recipe to your table? Paula Deen’s classic green bean casserole is a beloved dish in many American homes. It’s a mix of green beans, cream of mushroom soup, and french-fried onions.

This Southern cooking classic is a must-try for anyone wanting to taste authentic comfort food.

Key Takeaways

  • Paula Deen’s green bean casserole is a classic Southern dish that combines green beans, cream of mushroom soup, and french-fried onions.
  • This comfort food recipe is perfect for any occasion, from holidays to family gatherings.
  • Southern cooking is known for its rich history and cultural significance, and Paula Deen’s green bean casserole is a prime example.
  • The recipe is easy to make and requires minimal ingredients, making it a great option for beginners.
  • Paula Deen’s green bean casserole is a versatile dish that can be served as a side or main course.
  • This classic recipe is a must-try for anyone looking to experience the authentic taste of Southern cuisine.

The Story Behind Paula Deen’s Green Bean Casserole

Paula Deen’s green bean casserole is a beloved thanksgiving side dish in many American homes. It’s a mix of green beans, creamy sauce, and crispy fried onions. This combination makes it a comfort food classic.

Paula Deen’s Southern cooking style is all about hearty, comforting meals. The green bean casserole is a key part of this tradition. It has become a staple at thanksgiving tables, with families adding their own twists to the paula deen recipe.

Paula’s Southern Cooking Legacy

Paula Deen’s cooking is deeply rooted in Southern tradition. It focuses on fresh, local ingredients and classic techniques. The green bean casserole is a perfect example, blending green beans, creamy sauce, and fried onions.

How This Recipe Became a Family Favorite

The paula deen recipe for green bean casserole is loved for many reasons. It’s simple to make, tastes great, and can be adjusted for different tastes and diets. It’s perfect for thanksgiving or any family gathering.

The Evolution of Green Bean Casserole in Southern Cuisine

The green bean casserole has changed over time, with different regions adding their own twists. From the classic Southern version to modern takes, it remains a favorite in many American homes.

IngredientQuantity
Green beans1 pound
Cream of mushroom soup1 can
Fried onions1 cup

Essential Ingredients for the Perfect Casserole

To make a tasty green bean casserole, you need top-notch ingredients. Fresh green beans, cream of mushroom soup, and french-fried onions are key. They make this dish a favorite in many homes.

When picking ingredients for your green bean casserole, remember these important ones:

  • Fresh or frozen green beans for the best taste and texture
  • Cream of mushroom soup for a rich, savory base
  • French-fried onions for a crispy, golden-brown topping
  • Black pepper and salt to boost the flavor

In southern cooking, the quality of ingredients really matters. For a real comfort food recipe like green bean casserole, choose ingredients that work well together. This way, you’ll make a dish that’s both tasty and satisfying.

With these key ingredients, you’re ready to make a green bean casserole that will impress everyone. It’s perfect for family gatherings or holiday meals. This classic southern dish is sure to become a hit.

IngredientQuantityImportance
Fresh green beans1 poundHigh
Cream of mushroom soup1 canMedium
French-fried onions1 cupHigh

Kitchen Tools and Equipment Needed

To make the perfect green bean casserole, a classic paula deen recipe, you need the right tools. This thanksgiving side dish is a key part of southern cooking. With the right tools, you’ll get the perfect mix of flavors and textures.

Here are the must-have utensils and equipment you’ll need to get started:

  • 9×13 inch baking dish
  • Food processor
  • Whisk
  • Measuring cups and spoons

Must-Have Utensils

You might also want a stand mixer or a slow cooker. These tools can make cooking easier and help you get the best results.

Recommended Baking Dishes

The right baking dish is crucial for the perfect green bean casserole. Look for a 9×13 inch dish with a non-stick coating. This prevents the casserole from sticking.

Time-Saving Kitchen Tools

Using the right kitchen tools can save you time and effort. Consider getting a food processor or a stand mixer. They help you prepare and bake the perfect green bean casserole.

ToolDescription
Food ProcessorChops and slices ingredients quickly and easily
Stand MixerMixes and whips ingredients with ease
Slow CookerCooks the casserole slowly and evenly

Step-by-Step Paula Deen Green Bean Casserole Instructions

To make a tasty paula deen green bean casserole, first heat your oven to 350°F. This comfort food recipe is simple and needs just a few things. You’ll need green beans, cream of mushroom soup, and french-fried onions.

Here’s how to make the best green bean casserole:

  • Mix the green beans, cream of mushroom soup, and black pepper in a bowl.
  • Add the french-fried onions and mix until they’re spread out.
  • Put the mix in a 9×13 inch dish and bake for 25-30 minutes. Wait until the onions are golden.

For more recipe ideas, check out gluten-free breakfast casserole recipes. The secret to a great paula deen green bean casserole is using top-notch ingredients and not overmixing.

With these easy steps, you’ll soon enjoy a yummy comfort food recipe. So, try this green bean casserole recipe and see the difference for yourself.

Secret Tips for the Crunchiest Topping

To get the crunchiest topping on your green bean casserole, a classic paula deen recipe, pay attention to the details. In southern cooking, texture and flavor are key. For a tasty thanksgiving side dish, use these expert tips to elevate your casserole.

Choosing the right fried onions is key for a crunchy topping. Look for onions that are crispy and golden, with a light flavor. Making your own fried onions can add an extra crispy touch.

Perfecting the Crispy Layer

To get the crispy layer just right, spread the fried onions evenly over the casserole. Adding crushed crackers or crispy bacon can also add crunch. For a twist, mix fried onions with crispy shallots for a flavorful topping.

By using these secret tips, you’ll make a green bean casserole with the crunchiest topping. It’s perfect for thanksgiving side dishes or everyday meals. This classic paula deen recipe will become a family favorite.

Make-Ahead and Storage Guidelines

Preparing a tasty green bean casserole is easier with the right make-ahead and storage tips. This comfort food recipe is great for busy days. You can enjoy it whenever you like with the right storage.

For a stress-free cooking day, prepare the casserole parts ahead. Here’s how:

  • Prepare the green beans and store them in an airtight container in the refrigerator for up to 24 hours.
  • Make the creamy sauce and store it in the refrigerator for up to 48 hours.
  • Assemble the casserole and refrigerate it for up to 24 hours before baking.

You can also freeze the assembled casserole for up to 3 months. Just thaw it overnight in the fridge and bake as instructed. This southern cooking classic is great for meal prep and can be enjoyed all year.

By following these tips, you can enjoy your favorite green bean casserole anytime. It’s perfect for busy parents or avid cooks. This comfort food recipe will be a favorite in your kitchen.

Storage MethodStorage Time
RefrigerateUp to 24 hours
FreezeUp to 3 months

Common Mistakes to Avoid

When making a paula deen green bean casserole, a classic thanksgiving side dish, it’s essential to be aware of common mistakes that can affect the final result. To ensure your southern cooking turns out delicious, follow these tips to avoid pitfalls. Temperature control is crucial, as it can make or break the dish.

Avoid overcooking the green beans, as this can lead to an unappealing texture. Texture troubleshooting is vital to achieving the perfect balance of crunch and tenderness. By being mindful of these factors, you can create a mouthwatering paula deen green bean casserole that will impress your family and friends.

Temperature Control Tips

  • Preheat your oven to the correct temperature to ensure even cooking.
  • Use a food thermometer to check the internal temperature of the casserole.
  • Avoid opening the oven door too frequently, as this can disrupt the cooking process.

Seasoning Balance

To achieve the perfect seasoning balance in your paula deen green bean casserole, a classic thanksgiving side dish, it’s essential to taste and adjust as you go. This will help you create a delicious, well-balanced dish that showcases the best of southern cooking.

By following these tips and being mindful of common mistakes, you can create a paula deen green bean casserole that’s sure to become a favorite at your thanksgiving gatherings. With its rich, savory flavor and satisfying texture, this classic southern cooking dish is perfect for special occasions and everyday meals alike.

Serving Suggestions and Pairings

There are many ways to serve a paula deen recipe like green bean casserole. It’s great for holidays, family dinners, or a quick weeknight meal. Try pairing it with mashed potatoes, roasted veggies, or a fresh salad for a complete meal.

For a special event, add the green bean casserole to your holiday menu. You can pair it with turkey, ham, or roast beef. The goal is to mix flavors and textures so the casserole complements the other dishes. Here are some serving and pairing ideas:

  • Pair the casserole with a crunchy salad, featuring fresh greens, nuts, and dried fruits.
  • Serve it alongside a hearty soup, such as creamy tomato or butternut squash.
  • Offer it as a side dish for a holiday meal, paired with roasted meats and steamed vegetables.

By using these serving suggestions and pairing ideas, you can enjoy your green bean casserole in many ways. It becomes a versatile and delicious addition to any meal.

Holiday Menu Integration

For a special holiday menu, pair the green bean casserole with classic dishes like roasted turkey, mashed potatoes, and steamed veggies. This creates a well-rounded and satisfying meal that will impress your guests.

Complementary Side Dishes

You can also serve the green bean casserole with other side dishes like roasted sweet potatoes, green salads, or warm bread. The key is to balance flavors and textures for a better dining experience.

Side DishDescription
Roasted Sweet PotatoesA sweet and savory side dish that pairs perfectly with the green bean casserole.
Green SaladA fresh and crunchy salad that provides a nice contrast to the rich casserole.
Warm BreadA comforting and satisfying side dish that is perfect for sopping up the savory sauce from the casserole.

Recipe Variations and Dietary Adaptations

Paula Deen’s green bean casserole doesn’t have to be just one way. You can make it fit your diet with a few tweaks. Try gluten-free options or healthier swaps to find your favorite flavor mix.

In southern cooking, it’s all about being creative. If you can’t have gluten, try almond flour or coconut flour instead of regular flour. It changes the taste and texture in a good way.

Gluten-Free Options

  • Replace traditional flour with gluten-free alternatives
  • Use gluten-free cream of mushroom soup
  • Choose gluten-free fried onions for the topping

Healthier Substitutions

Want a healthier version? Use low-sodium cream of mushroom soup and low-fat milk. Adding steamed veggies or lean proteins can also boost nutrition. These changes keep the dish tasty while being kinder to your body.

These tweaks let you enjoy Paula Deen’s green bean casserole your way. It’s perfect for those who love traditional southern dishes or prefer healthier choices. This classic recipe is sure to hit the spot.

Conclusion: Mastering Paula’s Southern Classic

Paula Deen’s green bean casserole is a true culinary masterpiece. It has stood the test of time. By mastering the essential ingredients, techniques, and preparation methods, you’ll create a dish that captures the authentic flavors of the South.

This paula deen recipe will delight your taste buds and impress your guests. You can also adapt the green bean casserole to fit your dietary needs or personal preferences. This makes it a versatile addition to your culinary repertoire.

As you explore southern cooking, embrace the rich history and flavors of Paula Deen’s recipes. With this guide, you’re well on your way to becoming a true master of this timeless classic. Savor every bite, share it with loved ones, and let the flavors of the South transport you to a place of pure comfort and joy.

FAQ

What are the key ingredients in Paula Deen’s green bean casserole?

Paula Deen’s green bean casserole needs fresh green beans, cream of mushroom soup, and french-fried onions. These ingredients mix to make a tasty and cozy side dish.

How do I prepare the green bean casserole ahead of time?

To prep the casserole early, assemble it, cover it, and chill it for up to 2 days. Then, let it warm up to room temperature before baking.

What’s the secret to achieving the crunchiest topping?

For the crunchiest topping, use top-notch french-fried onions. Make sure they’re spread evenly over the casserole. Tossing the onions with flour can also help.

Can I make a gluten-free version of the green bean casserole?

Yes, making a gluten-free version is easy. Just swap the cream of mushroom soup and french-fried onions for gluten-free ones. This makes the dish safe for those with gluten issues.

What are some common mistakes to avoid when making the green bean casserole?

Avoid overcooking the green beans and using too much or too little cream of mushroom soup. Also, don’t forget to season it well. Pay close attention to the baking temperature and time for the best results.

Easy and Creamy Campbell’s Green Bean Casserole Dish

campbells green bean casserole dish​

What makes a classic holiday side dish unforgettable? It’s the mix of tender green beans, creamy sauce, and crunchy fried onions. Campbell’s Green Bean Casserole is a favorite at holiday meals. Its lasting popularity shows how easy and tasty it is.

We’ll look into what makes this dish special. It’s loved by kids and adults alike. We’ll cover its history and how simple it is to make. This guide will help you make a delicious Campbell’s Green Bean Casserole that will wow your guests.

Key Takeaways

  • Learn the history behind Campbell’s Green Bean Casserole dish and its significance in American cuisine
  • Discover the essential ingredients and step-by-step preparation guide for a classic holiday side dish
  • Explore variations and add-ins to make your easy casserole dish truly unique
  • Get tips on making the creamiest Campbell’s Green Bean Casserole dish for your next holiday meal
  • Understand common mistakes to avoid and how to troubleshoot issues with your dish
  • Find out how to make your campbells green bean casserole dish ahead of time and store it for later use

The History Behind Campbell’s Green Bean Casserole Dish

The green bean casserole recipe has a rich history that started in the 1950s. Campbell’s, a well-known food brand, introduced it. It was made to be easy and affordable, using green beans, cream of mushroom soup, and French-fried onions.

Dorcas Reilly, a home economist at Campbell’s, created the recipe. It was meant to be simple and tasty, for anyone to make. Over time, the recipe has changed, but its core remains the same. Today, it’s a favorite in many American homes.

Origins of the Recipe

The recipe started in the 1950s with Campbell’s. They wanted to promote their cream of mushroom soup. The green bean casserole was born, and it quickly became popular.

Why It Became a Holiday Staple

The green bean casserole became a holiday favorite because it’s easy to make and tastes great. It’s a traditional dish served during holidays. Campbell’s recipes are known for their simplicity and flavor, and this dish is no exception.

Evolution Through the Years

Over the years, the green bean casserole recipe has seen changes. People have added their own touches, like different spices. But the core of the recipe remains the same. It’s a beloved dish in many American homes, showing the power of food to bring people together.

Essential Ingredients for the Perfect Casserole

To make a delicious green bean casserole, you need the right ingredients. These pantry staples include green beans, cream of mushroom soup, milk, French-fried onions, and black pepper. Each one is key to the dish’s flavor and texture.

The cream of mushroom soup gives the casserole a rich, creamy base. French-fried onions add a crunchy texture. Having these ingredients ready makes cooking the casserole easy and quick. Here’s what you’ll need:

  • 1 pound fresh or frozen green beans
  • 1 can of cream of mushroom soup
  • 1/2 cup of milk
  • 1/2 cup of French-fried onions
  • A pinch of black pepper

With these ingredients, you’re ready to make a tasty green bean casserole. The mix of creamy soup, crunchy onions, and tender green beans is comforting and flavorful. Having these pantry staples means you can make a delicious casserole quickly.

This recipe is great for both seasoned cooks and beginners. It’s easy to follow and needs just a few ingredients. So, why not try it out? This casserole’s rich flavor and crunchy texture will make it a new favorite.

IngredientQuantity
Green beans1 pound
Cream of mushroom soup1 can
Milk1/2 cup
French-fried onions1/2 cup
Black pepperA pinch

Step-by-Step Preparation Guide

To make a simple casserole like Campbell’s Green Bean Casserole, follow a clear process. This dish is easy to make, even for those new to cooking. The secret to a great casserole is in how you prepare each part.

Start by cooking the green beans until they’re tender. You can steam or boil them. While the green beans cook, mix the cream of mushroom soup with milk for the sauce. This sauce adds a rich, creamy flavor to the dish.

Preparing the Green Beans

Cooking the green beans is a simple step. They should be tender but still crisp. You can steam them for a few minutes or boil them until they’re just right.

Making the Cream Sauce

The cream sauce is made by mixing the cream of mushroom soup with milk. This sauce is key for a rich, creamy flavor. Make sure the sauce is smooth and lump-free by mixing it well.

Assembly Instructions

Assembling the casserole is easy. Mix the cooked green beans, cream sauce, and half of the French-fried onions in a dish. Sprinkle the rest of the onions on top for a crispy topping.

Baking Tips

To bake the casserole right, pay close attention. Cover it with foil for the first 25 minutes to prevent onion burning. Then, bake until the onions are golden and the casserole is hot and bubbly.

Tips for Creating the Creamiest Campbell’s Green Bean Casserole

To make a delicious green bean casserole, follow some simple tips. Using fresh green beans instead of frozen ones improves texture and taste. It’s also important not to overcook the casserole, as this can dry out the cream sauce.

Here are some additional tips to make your festive green bean dish creamier and more appealing:

  • Use high-quality cream of mushroom soup to add richness and depth to the casserole.
  • Add a pinch of black pepper to enhance the flavor.
  • Consider adding some diced bell peppers or chopped fresh parsley on top of the casserole before baking for a pop of color and extra flavor.

A well-made delicious green bean casserole can be the highlight of any holiday meal. By following these tips, you can create a festive green bean dish that will impress your guests.

With these simple tips, you can elevate your Campbell’s Green Bean Casserole. You’ll create a truly unforgettable delicious green bean casserole perfect for any occasion.

Tips for Creamiest CasseroleBenefits
Use fresh green beansImproved texture and flavor
Don’t overcook the casserolePrevents cream sauce from drying out
Add a pinch of black pepperEnhances flavor

Common Mistakes to Avoid

When making Campbell’s Green Bean Casserole, it’s key to know common mistakes. These can mess up the dish’s texture and taste. To get it right, stick to the recipe and avoid mistakes like wrong oven temperature, bad ingredient mix, and overcooking.

Temperature control is crucial for a great casserole. Make sure your oven is at the right temperature. This way, the casserole cooks evenly. Using campbells recipes can help you avoid these mistakes and make a tasty, creamy dish.

Temperature Control Issues

Wrong oven temperature can ruin the casserole. It might be undercooked or overcooked. Always preheat your oven to the correct temperature before baking.

Ingredient Proportions

Wrong ingredient amounts can mess up the casserole’s texture and taste. Too much cream of mushroom soup makes it too rich. Too little makes it dry. A traditional recipe, like campbells recipes, helps you get the amounts right.

Texture Problems

Texture issues, like soggy onions or undercooked green beans, can be fixed. Just follow the recipe closely and check the casserole while it’s baking. By avoiding these mistakes, you’ll make a delicious, traditional casserole that everyone will love.

Delicious Variations and Add-ins

The green bean casserole recipe is full of possibilities. It’s easy to make and can be changed to fit any taste. Try adding diced ham or crispy bacon bits for a smoky taste.

Adding grated cheese, like cheddar or parmesan, makes it creamy. Diced bell peppers add color and flavor. Sprinkle paprika for a smoky touch. For more ideas, check out gluten-free breakfast casserole recipes.

Some popular ways to change the green bean casserole include:

  • Diced ham and bacon bits for a smoky flavor
  • Grated cheese, such as cheddar or parmesan, for a creamy element
  • Diced bell peppers for added color and flavor
  • Paprika for a smoky depth

Experimenting with different ingredients lets you make a unique green bean casserole. It’s easy to make and can be customized for any event.

Trying these variations can make the classic green bean casserole into a new favorite. So, be creative with your green bean casserole recipe. Enjoy making this easy dish your own.

Make-Ahead and Storage Guidelines

Making a campbells green bean casserole ahead of time is a big plus. It’s perfect for busy holiday times. Preparing it early saves time and reduces holiday stress.

To make the most of this feature, follow some guidelines. You can fully assemble the casserole and refrigerate it overnight or freeze it for up to a month. This lets you prepare the dish early and store it until serving time.

Preparation Timeline

Here’s a general outline to follow:

  • Assemble the casserole up to a day in advance and refrigerate overnight.
  • Freeze the casserole for up to a month and thaw overnight in the refrigerator before serving.

Storage Methods

When storing the casserole, cool it completely first. This step prevents bacteria growth and keeps the dish fresh.

Reheating Instructions

To reheat, cover the casserole with foil to prevent onion burning. This keeps the dish moist and flavorful. By following these guidelines, you can enjoy a delicious campbells green bean casserole at your next holiday gathering. It’s also a great pantry staple recipe.

Storage MethodShelf Life
RefrigerateUp to 3 days
FreezeUp to 1 month

Pairing Suggestions for Your Holiday Menu

Starting with a classic holiday side dish like Campbell’s Green Bean Casserole is a smart move. This festive green bean dish is loved by many families. Its rich, creamy flavor goes well with different main courses and side dishes.

To balance the casserole’s richness, pair it with lighter, fresher options. Consider roasted meats or side dishes that complement it. Here are some ideas:

  • Roasted turkey or ham for a nice contrast in texture and flavor
  • Mashed potatoes or roasted vegetables to match the creamy sauce
  • A green salad for a refreshing and light touch

By choosing these options, you can make a well-rounded and satisfying holiday meal. The goal is to balance rich and light, heavy and fresh. This way, your festive green bean dish becomes the highlight of a memorable holiday meal.

Nutritional Information and Dietary Adaptations

When looking at campbells recipes, like the traditional casserole, it’s key to check the nutrition. The casserole has a lot of calories and sodium. This is mainly because of the cream of mushroom soup and French-fried onions.

But, you can make this dish fit different diets with a few tweaks. For less sodium, try low-sodium cream of mushroom soup or use less of it. Here are some ways to adapt:

  • Using low-sodium cream of mushroom soup
  • Reducing the amount of French-fried onions used
  • Substituting the cream of mushroom soup with a vegan alternative for a vegetarian or vegan version

A traditional casserole recipe can be changed to meet various tastes and dietary needs. This makes it a great choice for any meal. By paying attention to the ingredients and how much you use, you can enjoy a tasty campbells recipes dish. Plus, you’ll be mindful of your nutritional needs.

Conclusion: Mastering Your Campbell’s Green Bean Casserole

Learning to make a tasty green bean casserole might seem hard, but this guide makes it easy. You can impress everyone at your next holiday or family dinner. The secret to success is in the details.

Just follow the steps, try new things, and use the expert tips. You’ll make a creamy, flavorful, and amazing Campbell’s Green Bean Casserole. Your guests will love it. This dish is a classic for a reason, and now you can make it your own.

So, don’t worry – start now, have fun, and show off your cooking skills. With this guide, you’re ready to make a delicious green bean casserole. You’ll start a new holiday tradition that everyone will remember for years.

FAQ

What is the history behind Campbell’s Green Bean Casserole?

Campbell’s Green Bean Casserole was created in 1955 by Dorcas Reilly. She was a home economist at Campbell’s. It was made to be easy and affordable, using green beans, cream of mushroom soup, and French-fried onions.

Over the years, it has become a holiday favorite. People have added their own twists, but the core remains the same.

What are the essential ingredients for the perfect Campbell’s Green Bean Casserole?

The key ingredients are fresh or frozen green beans, cream of mushroom soup, milk, French-fried onions, and black pepper. Each plays a crucial role in the dish’s flavor and texture.

How do I prepare Campbell’s Green Bean Casserole step-by-step?

First, cook the green beans until they’re tender. Then, mix the cream of mushroom soup with milk to make the cream sauce.

Combine the cooked green beans, cream sauce, and half of the French-fried onions in a dish. Top with the rest of the onions. Bake until the onions are golden and the casserole is hot.

What tips can I use to create the creamiest Campbell’s Green Bean Casserole?

For creaminess, use fresh green beans and don’t overcook. Add a pinch of black pepper. For a festive look, top with diced bell peppers or parsley before baking.

What common mistakes should I avoid when making Campbell’s Green Bean Casserole?

Avoid incorrect oven temperature and wrong ingredient amounts. Also, don’t overcook. Preheat the oven right, use the correct amounts, and check the casserole while it bakes.

What are some delicious variations and add-ins I can try with Campbell’s Green Bean Casserole?

Try adding diced ham or bacon for smokiness. Grated cheese adds creaminess. Diced bell peppers add color and flavor. A sprinkle of paprika adds smoky depth.

Can I make Campbell’s Green Bean Casserole ahead of time, and how should I store it?

Yes, you can make it ahead. Assemble the casserole and refrigerate overnight or freeze for a month. Reheat covered to prevent onion burning. Cool completely before refrigerating or freezing.

What are some good pairing suggestions for serving Campbell’s Green Bean Casserole during the holidays?

It goes well with turkey, ham, or beef. Pair it with mashed potatoes, roasted veggies, or a green salad. Balance the richness with lighter options.

What is the nutritional information for Campbell’s Green Bean Casserole, and can it be adapted for dietary restrictions?

It’s high in calories and sodium, mainly from the soup and onions. For less sodium, use low-sodium soup or reduce the amount. For a vegan version, use vegan soup and omit animal products.

Armadillo Eggs: A Delightful Recipe to Explore

armadillo eggs recipe​

What makes armadillo eggs so special and loved by many? It’s the mix of creamy cheese, spicy peppers, and savory sausage. This combo creates a flavor that’s hard to resist. It’s why these easy armadillo eggs are a hit at parties.

These delicious armadillo eggs can be made to fit any taste. Whether you like it mild or wild, there’s a version for you. One thing is sure – armadillo eggs offer a fun twist on traditional appetizers. They’ll have your guests coming back for more.

Key Takeaways

  • Armadillo eggs are a unique and delicious appetizer that combines cheese, peppers, and sausage.
  • The armadillo eggs recipe is easy to customize to suit any taste.
  • Delicious armadillo eggs can be made with a variety of ingredients, including different types of cheese and peppers.
  • Easy armadillo eggs are perfect for parties and gatherings.
  • Armadillo eggs recipe can be made ahead of time and stored for later use.
  • The key to making delicious armadillo eggs is to use high-quality ingredients and to not be afraid to experiment with different flavors.

What Are Armadillo Eggs?

Armadillo eggs are a tasty dish that’s become very popular. They have a unique history and flavor. These “eggs” are actually jalapeño peppers filled with cheese, meat, and spices. They’re then wrapped in dough or beef.

The name “armadillo eggs” comes from their egg-like shape. They are a big part of southern United States culture, thanks to jalapeños. Now, there are many armadillo eggs variations with different tastes.

Some armadillo eggs variations use different cheeses or add onions or bell peppers. The history of armadillo eggs shows how creative cooks have made this dish over time.

Armadillo Eggs VariationDescription
Classic Armadillo EggsJalapeños stuffed with cheese and wrapped in beef
Spicy Armadillo EggsJalapeños stuffed with cheese and diced onions, wrapped in beef
Veggie Armadillo EggsJalapeños stuffed with cheese and bell peppers, wrapped in dough

If you love spicy food or want to try something new, armadillo eggs are a great choice. With their rich history of armadillo eggs and many armadillo eggs variations, there’s something for everyone.

Essential Ingredients for Perfect Armadillo Eggs

To make delicious armadillo eggs, you need the right ingredients. The recipe includes cheese, peppers, and more. Cheese is key, with cheddar, Monterey Jack, or a mix being popular.

Jalapeños add a spicy kick that goes well with the cheese. Other must-haves are garlic, onion, and beef. They bring depth and smokiness. You can tweak the recipe to your liking, but these ingredients are crucial for great flavor.

  • Cheese (cheddar, Monterey Jack, or a blend)
  • Jalapeños or other peppers
  • Garlic
  • Onion
  • Beef

With these ingredients, you can make a tasty and true armadillo eggs recipe.

The Ultimate Armadillo Eggs Recipe

To make the best armadillo eggs, start with jalapeños, cream cheese, and sausage. This recipe is great for both beginners and experienced cooks. You can also add your own twist by using different cheeses or adding diced onions.

Here’s a brief overview of what you can expect from this recipe:

  • Preparation time: 20 minutes
  • Cooking time: 15 minutes
  • Servings: 12-15 armadillo eggs

Step-by-Step Instructions

First, preheat your oven to 400°F. Then, slice the jalapeños in half and remove the seeds and membranes. Fill each jalapeño with a mix of cream cheese and sausage, and wrap with beef.

Place the armadillo eggs on a baking sheet. Bake for 15 minutes, or until the beef is crispy.

Pro Tips for Success

To make sure your armadillo eggs are perfect, don’t overfill the jalapeños. Use high-quality ingredients like thick-cut beef and fresh jalapeños. Follow these tips and the recipe to make delicious homemade armadillo eggs that will impress everyone.

IngredientQuantity
Jalapeños12-15
Cream cheese8 oz
Sausage1 lb
Beef12-15 slices

Choosing and Preparing the Perfect Jalapeños

When making jalapeno popper armadillo eggs, picking the right jalapeños is key. The heat in your dish depends on the jalapeño type and how they’re prepared. It’s important to handle them safely and prepare them right for the best taste.

For spicy armadillo eggs, pick firm, green jalapeños. You can adjust the heat by using more or fewer jalapeños. To get ready, just slice off the stems, cut them in half, and remove the seeds and membranes.

Here are some tips for preparing jalapeños:

  • Wear gloves when handling jalapeños to avoid irritating your skin
  • Use a spoon to scoop out the seeds and membranes
  • Chop the jalapeños finely to release their flavors and oils

By following these tips, you’ll make delicious jalapeno popper armadillo eggs. They’ll impress anyone, whether you like them spicy or mild. With practice, you’ll be making these eggs like a pro.

Jalapeño PreparationLevel of Heat
Seeds and membranes removedMild
Seeds and membranes left inSpicy

Beef Wrapped Armadillo Eggs: A Decadent Twist

Looking to make your Armadillo Eggs even better? Try wrapping them in beef. This adds a smoky flavor, perfect for special moments. Choose thick-cut, smoked beef for the best results.

Wrapping the beef wrapped armadillo eggs needs some care. Wrap the beef tightly around the eggs. Use a toothpick if it helps. For an extra treat, wrap them in multiple beef layers.

  • Choose the right beef: thick-cut, smoked beef works best
  • Wrap the beef tightly: use a toothpick to secure if needed
  • Cook slowly: grill or smoke the Armadillo Eggs over low heat to prevent burning

Follow these tips and use top-notch ingredients. You’ll make decadent armadillo eggs that wow everyone. The mix of crispy beefd and spicy eggs is amazing, great for any time.

beef TypeWrapping TechniqueCooking Method
Thick-cut, smokedTightly wrapped, secured with toothpickGrilled or smoked over low heat

Smoking vs. Grilling: Best Cooking Methods

When cooking armadillo eggs, you have two main choices: smoking and grilling. Each method gives a unique taste and texture. For example, grilled armadillo eggs have a crispy outside and a smoky taste. On the other hand, smoking armadillo eggs are tender and full of savory flavor.

Deciding between the two depends on what you like and what you have. If you have a smoker, smoking armadillo eggs is a good choice. But if you want a crispy outside, grilled armadillo eggs are better. Here are some things to think about:

  • Flavor profile: Smoking gives a deep, rich taste, while grilling offers a smoky, charred flavor.
  • Texture: Smoking makes the eggs tender, while grilling gives a crispy outside and a firm inside.
  • Equipment: Smoking needs a smoker, but grilling can be done on a grill or grill pan.

Both smoking and grilling can make delicious armadillo eggs. By thinking about what you like and what you have, you can pick the best way to get your favorite taste and texture.

Spice Level Customization

The heat level in spicy armadillo eggs is key. To get the flavors just right, it’s important to know how to adjust the heat. If you prefer less heat, try using fewer jalapeños or milder peppers. For those who enjoy a spicy kick, add more jalapeños or use hotter peppers like habaneros.

Custom armadillo eggs can be made by trying different cheese and pepper mixes. Here are some favorites:

  • Cheddar cheese with diced jalapeños for a classic spicy armadillo egg
  • Pepper jack cheese with sliced habaneros for an extra kick
  • Mozzarella cheese with diced Anaheim peppers for a milder flavor

By tweaking the heat and mixing cheeses and peppers, you can make armadillo eggs that fit your taste. Whether you prefer them mild or spicy, there’s a wide range of options.

Creating great armadillo eggs is all about experimenting and finding the right mix of flavors. Feel free to try new combinations and adjust the heat to your liking. With a bit of practice, you’ll be whipping up delicious custom armadillo eggs in no time.

CheesePepperHeat Level
CheddarJalapeñoMild
Pepper JackHabaneroHot
MozzarellaAnaheimMild

Make-Ahead and Storage Tips

Planning ahead is key for enjoying homemade armadillo eggs at your convenience. Prepare a batch and store armadillo eggs for later. This way, you always have tasty bites ready.

To store homemade armadillo eggs well, cool them first. Then, refrigerate or freeze them. Store them in airtight containers in the fridge for three days or freeze for two months.

To reheat, bake at 350°F (180°C) for 10-15 minutes. They should be crispy and golden. You can also microwave, but watch the cheese.

  • Prepare the filling and store it in the refrigerator for up to a day before assembling the armadillo eggs.
  • Assemble the armadillo eggs and store them in the refrigerator for up to a day before baking.
  • Freeze armadillo eggs on a baking sheet and then transfer them to a freezer-safe bag or container for easy storage.

Follow these tips to enjoy homemade armadillo eggs anytime. They’re perfect for parties or quick snacks. Making ahead and storing armadillo eggs saves time and keeps them delicious.

Storage MethodStorage TimeReheating Instructions
RefrigeratorUp to 3 daysBake at 350°F (180°C) for 10-15 minutes
FreezerUp to 2 monthsBake at 350°F (180°C) for 15-20 minutes

Common Mistakes to Avoid

When making armadillo eggs, it’s easy to make mistakes. These mistakes can ruin the taste and texture of your dish. Overcooking can make the eggs dry and rubbery. Using the wrong cheese can also affect the flavor and texture.

A good troubleshooting guide can help you fix these issues. If your eggs are not cooking evenly, it might be because of the temperature. Temperature control tips can also apply to armadillo eggs, ensuring they are cooked just right.

Troubleshooting Guide

  • Check the temperature: Make sure your cooking temperature is within the recommended range.
  • Use the right cheese: Choose a cheese that melts well and has a good flavor profile.
  • Don’t overcook: Cook the eggs until they are just set, then remove them from the heat.

Temperature Control Tips

Temperature control is key when making armadillo eggs. Keep an eye on the temperature and adjust as needed. With these tips and a bit of practice, you’ll make delicious armadillo eggs. You’ll avoid common mistakes and issues.

Perfect Pairings and Serving Suggestions

Serving armadillo eggs right can turn a simple snack into a memorable moment. You can try classic pairings or get creative with flavors and textures. This lets you experiment and find your favorite combinations.

Dipping Sauces

A great dipping sauce can really enhance armadillo eggs. Here are some favorites:

  • Ranch dressing for a creamy, tangy flavor
  • BBQ sauce for a sweet and smoky taste
  • Salsa for a spicy kick

These sauces bring out the best in armadillo eggs. They’re perfect for any gathering.

Side Dish Ideas

Pairing armadillo eggs with the right sides can make the meal more interesting. Try these options:

  • Coleslaw for a refreshing crunch
  • Baked beans for a sweet and smoky flavor
  • Grilled vegetables for a healthy and flavorful option

These sides balance out the richness of the eggs. They make for a complete and satisfying meal.

Exploring different pairings and serving ideas can make armadillo eggs a hit. Whether it’s for a party or just a snack, they’re a tasty and flexible choice. They’re sure to delight both you and your guests.

Party Planning with Armadillo Eggs

Planning a party with armadillo eggs involves a few key steps. First, figure out how many guests you’ll have and how many eggs you’ll need. A good rule is to plan for 2-3 eggs per guest. This depends on how big you want the servings to be and what else you’re serving.

Here are some tips for a great party:

  • Make armadillo eggs ahead of time to save time during the party
  • Have different dipping sauces ready to go with the eggs
  • Pair the eggs with salads or sides for a full menu

Armadillo eggs can make your party stand out. With good planning and presentation, they’ll be a hit.

By using these tips, you can make your party memorable. Armadillo eggs are perfect for any event, big or small. They add a fun twist to your menu.

Conclusion: Mastering Your Armadillo Eggs Game

Creating the perfect armadillo eggs is an art. It starts with choosing the best jalapeños and wrapping them in beef. Each step is key to a delicious dish.

Feel free to try new cheese and pepper mixes. You can also add your own twist to the classic recipe. Armadillo eggs are great for any occasion, from appetizers to dinner parties. With practice, you’ll become an expert in no time.

So, start making your perfect armadillo eggs. This recipe will wow anyone, whether you’re experienced or new to cooking. Enjoy the process and the tasty results!

FAQ

What are Armadillo Eggs?

Armadillo Eggs are a tasty twist on classic appetizers. They are jalapeños stuffed with cheese, wrapped in sausage or beef. Then, they are baked or grilled to perfection.

What is the history and origin of Armadillo Eggs?

The exact origin of Armadillo Eggs is unclear. However, they likely started in the southern United States. The name comes from their unique shape, like an armadillo’s shell.

What are the popular variations of Armadillo Eggs?

You can fill Armadillo Eggs with many things. Try different cheeses, diced beef, sausage, or shredded chicken. Some favorites include spicy versions, beef-wrapped ones, and creamy cheese fillings.

What are the essential ingredients for perfect Armadillo Eggs?

To make great Armadillo Eggs, you need jalapeños, cream cheese, sausage or beef, and seasonings. Use garlic, onion, and paprika. Adjust the ingredients to your liking.

How do I make the ultimate Armadillo Eggs recipe?

Start by picking and preparing the jalapeños. Stuff them with a creamy cheese mix, wrap in sausage or beef, and bake or grill. Follow the steps and tips for the best results.

How do I choose and prepare the perfect jalapeños for Armadillo Eggs?

Choose firm, fresh jalapeños without blemishes. Pick milder or hotter ones based on your taste. Handle them carefully, wear gloves, and remove seeds and membranes to control heat.

What are the benefits of beef-wrapped Armadillo Eggs?

Beef-wrapped Armadillo Eggs add a delicious twist. The beef’s crispy, salty exterior complements the creamy cheese and spicy jalapeño. It also keeps the eggs moist during cooking.

What are the best cooking methods for Armadillo Eggs?

You can bake, grill, or smoke Armadillo Eggs. Baking gives a crispy exterior and tender inside. Grilling adds smoky flavor. Smoking gives a rich, complex taste.

How can I customize the spice level of Armadillo Eggs?

Adjust the spice level by choosing jalapeño types and amounts. Use milder ones or remove seeds for less heat. Try different cheeses and peppers for the perfect spice and flavor balance.

How can I make Armadillo Eggs ahead of time and store them properly?

Make Armadillo Eggs ahead and store them in the fridge or freezer. Refrigerate in an airtight container for 3-4 days. Freeze for up to 2-3 months. Thaw and bake or grill when ready.

What are common mistakes to avoid when making Armadillo Eggs?

Avoid overstuffing, overcooking, using the wrong cheese, and not managing heat. A troubleshooting guide and temperature tips can help you avoid these mistakes.

What are the best pairings and serving suggestions for Armadillo Eggs?

Serve Armadillo Eggs with dipping sauces like ranch, blue cheese, or spicy aioli. They go well with other appetizers, like fresh veggies, crackers, or bread. Pair them with grilled corn, roasted potatoes, or a salad for a full meal.

How can I incorporate Armadillo Eggs into party planning?

Armadillo Eggs are great for parties. Plan the quantity based on guests and present them creatively. Pair them with other dishes and drinks for a complete menu.

Discover Irresistible Ricotta Dessert Recipes

ricotta dessert recipes

What makes ricotta desserts so appealing? Is it the creamy texture, the versatility, or the ease of making them at home? Whatever the reason, homemade ricotta sweets hold a special place in many hearts. We’ll explore classic Italian desserts, modern twists, and creative variations that highlight the best of ricotta desserts.

Whether you’re new to baking or experienced, you’ll find inspiration here. This guide focuses on easy ricotta desserts and homemade sweets. It’s perfect for anyone wanting to enjoy the creamy goodness of ricotta.

Key Takeaways

  • Explore a variety of ricotta dessert recipes, from classic to modern twists
  • Learn to make easy ricotta desserts at home with simple ingredients
  • Discover the versatility of ricotta in homemade ricotta sweets
  • Get inspired by creative variations of ricotta-based desserts
  • Find guidance on making delicious and irresistible ricotta desserts
  • Focus on easy ricotta desserts and homemade ricotta sweets for a sweet treat

The Sweet History of Ricotta in Dessert Making

Ricotta cheese has been a key part of Italian desserts for centuries. Its history is both rich and fascinating. This cheese is perfect for making ricotta dessert recipes because of its creamy texture and mild taste.

The story of ricotta cheese starts in ancient Italy. It was first made as a byproduct of cheese making. Italian chefs and bakers soon started using it in desserts like cannoli, cheesecakes, and tiramisu. These ricotta cheese desserts are now beloved in Italian cuisine.

Origins of Ricotta Cheese

Ricotta cheese comes from the whey of milk, leftover from cheese making. This whey is heated and mixed with acid. This causes it to curdle into curds and whey.

The curds are then strained and shaped. This creates the cheese’s unique texture and flavor.

Traditional Italian Ricotta Desserts

Desserts like cannoli, cheesecakes, and tiramisu are classic ricotta dessert recipes. They use fresh ricotta cheese mixed with sugar, eggs, and other ingredients. This makes a creamy and sweet filling.

Evolution of Modern Ricotta Treats

Modern ricotta cheese desserts have introduced new flavors and ingredients. Chefs and food bloggers are always coming up with new creamy ricotta desserts recipes. They share their creations online, inspiring others to try new things.

Essential Ingredients for Perfect Ricotta Desserts

To make tasty ricotta desserts, you need the right ingredients. High-quality ricotta cheese is key. Look for brands with a smooth, creamy texture and mild flavor. You can find these at most grocery stores or online. For a simple 3-ingredient biscuit recipe, check out this website.

Other important ingredients include sweeteners like sugar or honey, and flavorings like vanilla or lemon zest. Eggs or cream are also crucial. Freshness and quality matter a lot. Make sure to store ingredients well and use them before they go bad. Some desserts, like cannoli or cheesecake, need special ingredients like chocolate chips or fruit preserves.

Here are some tips for choosing the best ingredients for your ricotta desserts:

  • Opt for high-quality ricotta cheese that is fresh and has a smooth texture
  • Choose sweeteners that complement the flavor of your dessert, such as sugar or honey
  • Use flavorings like vanilla or lemon zest to add depth and complexity to your desserts

By following these tips and using the right ingredients, you’ll make delicious ricotta treats. They’re sure to impress everyone.

Classic Ricotta Dessert Recipes You Must Try

Explore the world of ricotta desserts, where creamy textures meet sweet flavors. These treats are unforgettable. From traditional Italian sweets to modern twists, there’s something for everyone. Whether you’re after easy desserts or homemade sweets, these classic recipes will inspire you.

Some of the most beloved ricotta dessert recipes include:

  • Cannoli with sweet ricotta filling, a classic Italian dessert that’s both crispy and creamy
  • Ricotta cheesecake, a creamy and rich dessert that’s perfect for special occasions
  • Italian ricotta cookies, a crumbly and sweet treat that’s perfect for snacking

These ricotta desserts are not only delicious but also easy to make. With simple ingredients and basic cooking skills, you can create stunning desserts. So why not try them and discover the joy of easy ricotta desserts and homemade sweets?

Whether you’re new to baking or experienced, these classic ricotta desserts will become favorites. So, get creative and indulge in the world of ricotta desserts. Your taste buds will love you for it!

Dessert RecipeIngredientsDifficulty Level
Cannoli with sweet ricotta fillingRicotta cheese, confectioners’ sugar, cinnamonMedium
Ricotta cheesecakeRicotta cheese, cream cheese, eggsHard
Italian ricotta cookiesRicotta cheese, flour, sugarEasy

Quick and Easy Ricotta Dessert Ideas

Looking for a sweet treat? Quick ricotta dessert ideas are perfect. They’re fast to make and great for any time. You can whip up dips or no-bake desserts in minutes.

Some top best ricotta dessert recipes are creamy cheesecakes, fluffy pancakes, and rich chocolate truffles. These delicious ricotta treats will wow anyone. You can also tweak them to fit any event or taste.

Here are a few quick ricotta dessert ideas to start with:

  • Ricotta and fruit parfait
  • No-bake ricotta cheesecake
  • Ricotta chocolate chip cookies

These recipes are easy and tasty. They’re sure to delight everyone. So, why not try them and enjoy the creamy, sweet taste of ricotta?

Healthy Alternatives in Ricotta-Based Sweets

Ricotta-based desserts are a great choice for healthier options. They offer many healthy ricotta dessert choices for different diets. You can make creamy ricotta desserts that are both tasty and good for you.

Looking for healthier ricotta desserts? Start with low-sugar options. Cutting down on sugar makes them better for you. Try using honey or maple syrup instead of sugar. Or, use fruit purees to sweeten them.

Gluten-Free Variations

Gluten-free options are another healthy choice. They’re perfect for those who can’t eat gluten. Use almond flour or coconut flour to make gluten-free cheesecakes or cookies.

Finally,

Protein-Rich Ricotta Treats

Adding protein to ricotta desserts boosts their nutrition. Nuts or seeds can make them creamy and nutritious. Try making ricotta and nut energy balls or adding seeds to cheesecakes.

With these healthy alternatives, you can enjoy ricotta desserts without feeling guilty. Look for low-sugar, gluten-free, or protein-rich options. There are many ways to make ricotta sweets healthier and more nutritious.

Mastering Ricotta Dessert Techniques

To make amazing ricotta dessert recipes, you need to get good at working with ricotta cheese. This means learning how to mix and whip it right, and how to bake and decorate your desserts. With a bit of practice and patience, you can become a pro at making easy ricotta desserts that wow everyone.

Mixing ricotta cheese with sugar, eggs, and flavorings is a key skill. It can be tricky because ricotta cheese is delicate and can separate easily. But, with the right methods and tools, you can make smooth and creamy homemade ricotta sweets that everyone will love.

If you want to get even better at making ricotta desserts, there are lots of online resources out there. You can find high-protein dessert recipes that use ricotta cheese. With a little creativity and trying new things, you can make all sorts of delicious and impressive ricotta desserts.

Here are some tips for getting better at making ricotta desserts:

  • Use high-quality ricotta cheese that’s fresh and has a good texture
  • Try different flavorings and ingredients to find your favorite mix
  • Be patient and take your time to get the techniques right

By following these tips and practicing your skills with ricotta cheese, you can make amazing ricotta dessert recipes that will impress everyone.

Seasonal Ricotta Dessert Variations

Ricotta desserts are perfect for any time of year. Each season brings new chances to make tasty treats. You can mix quick ideas into amazing desserts, from summer fruits to winter warmers.

Seasonal ingredients make the best ricotta desserts. In summer, ricotta pairs well with fresh fruits like strawberries or blueberries. For winter, warm spices like cinnamon add a cozy feel.

Summer Fruit and Ricotta Combinations

  • Strawberry and ricotta salad with balsamic glaze
  • Blueberry and ricotta tart with a hint of lemon
  • Peach and ricotta cobbler with a crunchy oat topping

Seasonal ideas can spark new dessert creations. Ricotta is great for both cool summer treats and warm winter desserts. It’s a versatile ingredient for any season.

Warm Winter Ricotta Treats

When it gets chilly, warm ricotta desserts are perfect. Mix ricotta with cinnamon, nutmeg, honey, or chocolate. These treats will be a hit during winter.

Troubleshooting Common Ricotta Dessert Challenges

When making ricotta dessert recipes, you might face some challenges. To get your easy ricotta desserts just right, let’s tackle common problems and their fixes. Issues like overmixing, underbaking, and wrong ingredient ratios can ruin your dessert.

Understanding texture and consistency is key to making great homemade ricotta sweets. If your ricotta is too runny, it won’t hold its shape. But if it’s too thick, it can become hard and dense. Getting the right consistency is essential.

Here are some common problems and how to solve them:

  • Overmixing: Stop mixing as soon as the ingredients come together.
  • Underbaking: Check your desserts frequently to avoid undercooking.
  • Incorrect ingredient ratios: Double-check your recipe to ensure you’re using the right proportions.

Knowing these common issues and how to avoid them will help you make delicious ricotta dessert recipes. With a bit of practice and patience, you’ll master making easy ricotta desserts and homemade ricotta sweets in no time.

The secret to success is paying attention to details and being open to trying new things. Don’t get discouraged if your first tries don’t work out. With time and practice, you’ll get better at making stunning ricotta dessert recipes that everyone will love.

Common IssueSolution
OvermixingStop mixing as soon as ingredients come together
UnderbakingCheck desserts frequently to avoid undercooking
Incorrect ingredient ratiosDouble-check recipe for correct proportions

Pairing and Presentation Tips

To make your ricotta desserts stand out, focus on pairing and presentation. The right flavors and looks can transform a simple dessert into a masterpiece. For example, adding a fruit compote or honey can bring elegance to your dish.

For plating, aim for simplicity yet impact. A sprinkle of powdered sugar or fresh berries can brighten up your dessert. Here are some tips to improve your presentation:

  • Use different textures to add depth, like nuts or smooth sauces.
  • Experiment with colors for a beautiful look, pairing creamy ricotta with bright fruits.
  • Try unique shapes, like cookie cutters, to make your desserts fun.

By using these tips, you can elevate your ricotta desserts. Whether they’re creamy or healthy, the right presentation can enhance your guests’ experience.

Storage and Make-Ahead Guidelines

To keep your delicious ricotta treats fresh and tasty, it’s key to follow proper storage and make-ahead guidelines. Whether you’re making quick ricotta dessert ideas or more complex best ricotta dessert recipes, knowing how to store and thaw is crucial.

Here are some tips for storing and preparing your ricotta desserts in advance:

  • Refrigerate your ricotta desserts at a temperature of 40°F (4°C) or below to prevent bacterial growth.
  • Freeze your ricotta desserts at 0°F (-18°C) or below to preserve their texture and flavor.
  • When thawing frozen ricotta desserts, do so in the refrigerator or at room temperature, depending on the type of dessert.

By following these guidelines, you can enjoy your best ricotta dessert recipes anytime. Whether for a special occasion or a quick dessert. Always check the freshness and quality before serving.

With these storage and make-ahead guidelines, you can make and enjoy many quick ricotta dessert ideas and delicious ricotta treats. Try different recipes and storage methods to find what works best for you and your creations.

Dessert TypeStorage MethodShelf Life
CheesecakesRefrigerate5-7 days
CannoliFreeze2-3 months
Ricotta CookiesRoom Temperature3-5 days

Conclusion: Creating Your Perfect Ricotta Dessert Adventure

The world of ricotta desserts is full of fun and endless choices. You can make everything from simple treats to unique sweets. This guide has given you the tools and ideas to start your own ricotta dessert journey.

Creating the perfect ricotta dessert is all about trying new things and being creative. Don’t be scared to try something different. Baking is all about the fun of finding new flavors and techniques.

So, what are you waiting for? Get your ingredients ready, turn on your oven, and let your creativity flow. Enjoy the creamy taste of ricotta and make desserts that everyone will love. Happy baking, and enjoy your delicious ricotta dessert adventure!

FAQ

What are some easy ricotta dessert recipes?

Easy ricotta desserts include no-bake cheesecakes and ricotta-stuffed apples. You can also make ricotta-lemon parfaits. These are quick to make and feature creamy ricotta.

How can I make homemade ricotta sweets?

Making homemade ricotta sweets is simple. Try making ricotta cookies or cake. You can even make cannoli with fresh ricotta. The key is using top-quality ricotta and the right mix of flavors.

What are some quick ricotta dessert ideas for last-minute gatherings?

For quick desserts, make a ricotta dip or layered parfaits. You can also whip up no-bake truffles. These ideas are perfect for sudden guests or quick parties.

What are the best ricotta dessert recipes to try?

Try classic Italian cheesecakes or homemade cannoli. Ricotta-stuffed peaches are also great. These recipes highlight ricotta’s creamy goodness in desserts.

Are there any healthy ricotta dessert options?

Yes, there are healthy options like low-sugar mousse and gluten-free tarts. Ricotta parfaits with protein are also good. These use ricotta with healthier ingredients for a guilt-free treat.

How do I store and make ahead ricotta desserts?

Store ricotta desserts in the fridge in a sealed container for 5 days. For make-ahead, prepare parts like filling or baked parts ahead. Then, assemble and serve on the day. This keeps your desserts fresh and tasty.

Tempting Low Sugar Dessert Recipes: Satisfy Cravings Responsibly

low sugar dessert recipes

Can you have your cake and eat it too, without harming your health? Many are now choosing low sugar dessert recipes to enjoy sweet treats without guilt. These recipes are perfect for those wanting to cut down on sugar.

Choosing low sugar desserts is a smart way to stay healthy. There are many options, from fruit-based treats to sugar-free cookies. You can indulge in your sweet cravings without harming your health.

Introduction to Healthy Desserts

Low sugar dessert recipes are for everyone, not just those with special diets. They let you enjoy tasty treats while keeping sugar intake low. Whether you need a quick dessert or something more elaborate, there’s a recipe for you.

Key Takeaways

  • Low sugar dessert recipes offer a guilt-free way to enjoy desserts
  • Healthy desserts are a great way to maintain a healthy diet
  • Low sugar dessert recipes can help reduce sugar intake
  • There are many options available for low sugar dessert recipes
  • Low sugar dessert recipes are not just for those with dietary restrictions
  • Low sugar dessert recipes can be quick and easy to make

Understanding the Benefits of Low Sugar Desserts

Lowering sugar intake can lead to better health. It can help keep blood sugar levels down and lower the risk of chronic diseases. By adding sugar-free treats to your diet, you can enjoy sweet foods without harming your health.

Low sugar desserts offer many benefits. They have fewer calories and can help prevent diseases like diabetes and heart disease. They also help control blood sugar levels.

These advantages make low sugar desserts a smart choice for those who care about their health. Plus, low glycemic desserts help keep blood sugar stable, which is great for people with dietary needs.

Many think low sugar desserts are tasteless or boring. But, with the right ingredients and recipes, they can be incredibly tasty. They’re perfect for any time you need a sweet fix, whether it’s a quick dessert or a special treat.

Adding low sugar desserts to your diet can greatly improve your health. Simple changes can reduce disease risks and boost your overall health. So, why not try low sugar desserts? They’re not only good for you but also delicious.

Essential Sugar Alternatives for Healthy Baking

Creating guilt-free sweets means finding the right sugar substitutes. These can make no sugar added desserts just as tasty as the originals. Honey, maple syrup, and coconut sugar are great options.

Here are some key sugar substitutes to try:

  • Stevia: a natural sweetener that’s 200-300 times sweeter than sugar
  • Monk fruit sweetener: a low-calorie sweetener made from a type of melon
  • Yacon syrup: a sweetener made from the root of the yacon plant

These alternatives can be used in many guilt-free sweets. From cakes and cookies to pies and pastries, you can enjoy your favorites without guilt.

When baking with these alternatives, finding the right balance is key. You might need to adjust liquid or spice levels. But with practice, you can make guilt-free sweets for any event.

“The key to making great no sugar added desserts is to experiment and have fun. Don’t be afraid to try new ingredients and flavor combinations until you find what works best for you.”

Sugar AlternativeCalories per teaspoonSweetness level
Stevia0200-300 times sweeter than sugar
Monk fruit sweetener0150-200 times sweeter than sugar
Yacon syrup201/3 as sweet as sugar

Quick and Easy Low Sugar Dessert Recipes

It’s hard to find desserts that are tasty and healthy. But, with simple ingredients and creative ideas, you can make delicious, diabetic-friendly treats. Low-carb sweets are not only better for you but also easy to prepare.

There are many quick and easy low sugar dessert recipes. Try making fruit-based treats in just five minutes, like a fruit salad with yogurt or nuts. No-bake desserts are also great, needing just a few ingredients and no cooking. Simple sugar-free cookies are another favorite, made with almond flour and natural sweeteners.

Five-Minute Fruit-Based Treats

  • Fruit salad with yogurt and nuts
  • Frozen fruit smoothie
  • Fruit and cheese skewers

No-Bake Healthy Desserts

No-bake desserts are perfect for hot days when you don’t want to cook. You can make no-bake energy balls with oats, nuts, and dried fruit. Or, try a no-bake cheesecake with an almond flour crust and a cream cheese filling.

Simple Sugar-Free Cookies

Sugar-free cookies are great for those who want to enjoy sweets without refined sugars. You can make them with almond flour, coconut flour, and natural sweeteners like stevia or erythritol. These cookies are tasty, low in carbs, and perfect for a low-carb diet.

Decadent Chocolate Treats Without the Sugar Rush

Enjoy rich, velvety chocolate treats that satisfy your cravings without the sugar rush. With easy dessert recipes and low sugar dessert recipes, you can indulge in decadent chocolate cakes, truffles, and more. All while keeping your sugar intake in check.

Some popular low sugar dessert recipes include:

  • Flourless chocolate cake made with almond flour and natural sweeteners
  • Dark chocolate truffles infused with fruit purees for added flavor
  • Chocolate mousse made with avocado and cocoa powder for a creamy, sugar-free treat

These easy dessert recipes are perfect for anyone looking to reduce their sugar intake without sacrificing flavor. By using natural sweeteners and sugar alternatives, you can create delicious, low sugar dessert recipes. These are both healthy and indulgent.

With a little creativity and experimentation, you can create your own decadent chocolate treats. These are not only delicious but also low sugar dessert recipes. So go ahead, indulge in the rich, chocolatey flavors you love. Enjoy them without the guilt or sugar rush.

RecipeIngredientsSugar Content
Flourless Chocolate CakeAlmond flour, dark chocolate, eggsLess than 10g per serving
Dark Chocolate TrufflesDark chocolate, fruit purees, creamLess than 5g per serving
Chocolate MousseAvocado, cocoa powder, eggsLess than 5g per serving

Fruit-Based Low Sugar Dessert Recipes for Natural Sweetness

Fruit-based desserts are a tasty way to enjoy sweetness without too much sugar. They use fruits as natural sweeteners. This makes them not only yummy but also healthy. For ideas, check out mango dessert recipes online.

Some favorite fruit desserts include:

  • Berry-based treats, like strawberry shortcake or blueberry muffins
  • Stone fruit desserts, such as peach cobbler or plum crisp
  • Tropical fruit desserts, like pineapple upside-down cake or mango sorbet

Berry-Based Desserts

Berry desserts are great for hot weather because they’re light and refreshing. You can use strawberries, blueberries, or raspberries to make healthy desserts full of flavor.

Stone Fruit Creations

Stone fruits, like peaches and plums, are sweet and juicy. They’re perfect for making sugar-free treats like crisps, cobblers, or salads.

Tropical Fruit Options

Tropical fruits, such as pineapples and mangoes, bring exotic flavors to desserts. You can make healthy desserts like sorbets, salads, or smoothies with them.

Baking Tips for Perfect Sugar-Free Desserts

Creating perfect sugar-free desserts requires some tips. Choose the right ingredients for the right texture and flavor. Natural sweeteners like stevia or honey are great for adding sweetness without guilt.

Here are some additional tips for baking guilt-free sweets:

  • Use almond flour or coconut flour instead of traditional flour to reduce the carb content of your desserts.
  • Choose sugar-free chocolate or cocoa powder to make delicious and rich desserts.
  • Don’t overmix your batter, as this can result in tough or dense desserts.

By following these tips, you can make delicious and healthy low glycemic desserts. They’re perfect for satisfying your sweet tooth without guilt. Always use fresh and high-quality ingredients for the best flavor and texture.

With practice and patience, you can master baking sugar-free desserts. They’re not only delicious but also good for you. So, get creative and enjoy your favorite low glycemic desserts without guilt.

DessertIngredientsPrep Time
Flourless Chocolate CakeAlmond flour, sugar-free chocolate, eggs20 minutes
Coconut MacaroonsCoconut flour, sugar-free sweetener, eggs15 minutes
Low Glycemic CheesecakeAlmond flour, sugar-free sweetener, cream cheese30 minutes

Diabetic-Friendly Dessert Options That Everyone Will Love

People with diabetes can enjoy tasty desserts without harming their health. No sugar added and diabetic-friendly desserts are perfect. They are low in sugar but full of flavor, great for anyone wanting a sweet treat.

Choosing desserts with a low glycemic index is key for diabetics. The glycemic index shows how fast a food raises blood sugar. Foods with a low index help keep blood sugar stable.

Low Glycemic Index Treats

Fruits, nuts, and dark chocolate are good examples of low glycemic index treats. They are full of fiber and antioxidants, making them a smart choice for diabetics.

Portion Control Guidelines

It’s important to control portions with diabetic-friendly desserts. Small servings help avoid too much sugar and calories. Here are some tips for portion control:

  • Choose small serving sizes
  • Use a food scale to measure portions
  • Avoid overeating

Safe Sweetener Options

Choosing the right sweeteners is crucial for diabetic-friendly desserts. Stevia, erythritol, and xylitol are good choices. They are low in calories and don’t raise blood sugar.

SweetenerCalories per servingGlycemic index
Stevia00
Erythritol0.20
Xylitol0.57

Special Occasion Low Sugar Desserts

Desserts are key on special days, but finding healthy options can be tough. Low-carb sweets and easy recipes offer a way to enjoy treats without harming health goals.

For birthdays, skip the usual cake for flourless chocolate cakes or fruit-based desserts. They’re tasty and fit low sugar diets. Plus, easy dessert recipes like no-bake energy balls or sugar-free cheesecakes are great for big parties.

Birthday Cake Alternatives

  • Flourless chocolate cakes
  • Fruit-based desserts
  • No-bake energy balls

Holidays can tempt us to overindulge, but you can make low-carb sweets that are festive. Try making easy dessert recipes like sugar-free cookies or low-carb fudge. They let you enjoy sweets without ruining your diet.

Holiday Treats

Weddings, anniversaries, and graduations mean time for rich desserts. But, you can still choose low-carb sweets. Use natural sweeteners like stevia or erythritol. Get creative with dark chocolate and fresh fruit in your recipes.

Conclusion: Embracing a Healthier Approach to Desserts

Low sugar dessert recipes and healthy desserts offer a sweet treat without the guilt. They let us enjoy our sweet cravings without harming our health.

Using natural sweeteners and choosing nutrient-rich ingredients is key. With so many tasty low sugar desserts out there, we don’t have to miss out. We can enjoy the taste while keeping our bodies healthy and our blood sugar stable.

Let’s explore healthy baking and find the joy in low sugar dessert recipes. Making better dessert choices can lead to a healthier life. And we can still enjoy the sweet moments that make life special.

FAQ

What are the health advantages of reducing sugar intake?

Cutting down on sugar can improve your health a lot. It helps manage blood sugar better and lowers the risk of diseases like diabetes and heart disease. Plus, it makes you feel better overall. Low sugar desserts let you enjoy sweet treats while staying healthy.

Can low sugar desserts still taste good?

Yes, they can! Using the right sugar substitutes and baking methods, low sugar desserts can taste amazing. Many sugar-free sweeteners offer sweetness without the bad effects of refined sugars.

What are some essential sugar alternatives for healthy baking?

Good sugar alternatives include natural sweeteners like honey, maple syrup, and dates. Also, low-calorie sweeteners like stevia, erythritol, and monk fruit are great. They help make desserts that are sweet but healthy.

What are some quick and easy low sugar dessert recipes?

There are many quick and easy low sugar dessert recipes. You can make treats in just a few minutes or no-bake desserts. Simple sugar-free cookies are also easy to make. These recipes are perfect for satisfying sweet cravings without spending a lot of time cooking.

How can I make decadent chocolate treats without the sugar rush?

Use low sugar ingredients to make rich, chocolatey desserts that are guilt-free. You can adapt recipes for chocolate cakes, truffles, and more to use natural sweeteners or sugar substitutes. This way, you can enjoy chocolate without the sugar rush.

What are some fruit-based low sugar dessert recipes?

Fruit-based desserts are naturally sweet and don’t need added refined sugars. Try berry-based, stone fruit, or tropical fruit desserts. They’re healthy and satisfy your sweet tooth in a better way.

What are some baking tips for perfect sugar-free desserts?

For perfect sugar-free desserts, choose the right sugar alternatives and adjust your baking. Pay attention to texture and flavor. Use low glycemic index sweeteners, adjust liquid ratios, and add healthy fats for the best results.

What are some diabetic-friendly dessert options?

Diabetic-friendly desserts focus on low glycemic index, portion control, and safe sweeteners. These treats are great for everyone, not just those with diabetes. They offer a healthier choice compared to traditional high-sugar desserts.

What are some special occasion low sugar desserts?

For special occasions, find low-carb, easy-to-make desserts that fit different diets. Look for birthday cake alternatives, festive holiday treats, and celebration desserts that are delicious and guilt-free.

Enjoy Authentic Chicken Hibachi at Home

chicken hibachi recipe​

Can you make the tasty flavors of a Japanese steakhouse at home? Yes, with the right ingredients and techniques, you can. We’ll show you how to make a simple chicken hibachi recipe that’s just as good as your favorite restaurant. Let’s dive into theworld of homemade chicken hibachi and learn how to make it at home.

Key Takeaways

  • Learn how to make a delicious chicken hibachi recipe at home
  • Discover the essential ingredients and equipment needed for homemade chicken hibachi
  • Get tips on how to create an easy chicken hibachi recipe that’s perfect for any skill level
  • Explore the origins of hibachi cooking and its popularity in America
  • Find out how to customize your chicken hibachi dish with different seasonings and ingredients
  • Master the art of making a mouth-watering chicken hibachi dish in the comfort of your own kitchen

What is Chicken Hibachi: Understanding the Japanese Steakhouse Favorite

Chicken hibachi is a favorite dish in Japanese steakhouses that’s become popular in the U.S. It’s made with chicken, veggies, and a tasty sauce, all cooked on a special griddle called a hibachi.

To make quick chicken hibachi, you need the right stuff. The best recipe includes chicken, like breasts or thighs, and veggies like bell peppers, onions, and mushrooms. You also need a sauce with soy sauce, garlic, and ginger.

Origins of Hibachi Cooking

Hibachi cooking started in Japan, where it’s used to cook food on a griddle. The name “hibachi” comes from “hi” for fire and “bachi” for bowl or container.

Difference Between Hibachi and Teppanyaki

Hibachi and teppanyaki are both Japanese cooking methods. But they use different griddles and cooking styles. Hibachi uses a smaller, portable griddle, while teppanyaki uses a bigger, flat one.

If you want to try a tasty dish, a quick chicken hibachi recipe is perfect. With the right ingredients and tools, you can make a delicious hibachi chicken and vegetables dish at home.

Essential Equipment for Making Chicken Hibachi at Home

To make a tasty hibachi chicken recipe, you need the right tools. A big skillet or wok is key for cooking chicken hibachi. It helps cook food quickly and evenly. You’ll also need a cutting board for chopping ingredients and utensils like tongs and a spatula for handling food.

For a simple hibachi chicken recipe, the right equipment is crucial. Here are some must-haves for your kitchen:

  • A large skillet or wok with a non-stick surface
  • A cutting board for preparing ingredients
  • A set of utensils, such as tongs and a spatula
  • A chef’s knife for chopping vegetables and meat

With the right tools, you can make an authentic hibachi chicken recipe. It will taste great and look amazing. Remember to always use caution when cooking with oil and heat. Never leave your cooking station alone. With practice, you’ll be a pro at making simple hibachi chicken recipes!

Key Ingredients for Authentic Chicken Hibachi Recipe

To make a tasty chicken hibachi recipe, you need the right ingredients. Choose boneless, skinless chicken breast or thighs for the best results.

Traditional hibachi seasonings like soy sauce, ginger, and garlic are crucial. They add a lot of flavor. You can also use pre-mixed hibachi seasoning blends for an easy recipe.

Choosing the Right Cut of Chicken

When picking chicken, think about how you like it cooked. Thicker chicken takes longer to cook, while thinner pieces cook faster.

Traditional Hibachi Seasonings

Traditional seasonings include soy sauce, ginger, and garlic. These give the chicken and vegetables a rich, savory taste.

Essential Vegetables and Accompaniments

For a great chicken hibachi recipe, use sliced bell peppers, onions, and mushrooms. They add flavor, texture, and nutrients.

With these ingredients and a simple recipe, you can make a delicious hibachi meal at home. It will have flavorful chicken, veggies, and savory seasonings.

Preparing Your Workspace for Hibachi-Style Cooking

To make a tasty quick chicken hibachi, you need to get your workspace ready. This makes cooking a best chicken hibachi recipe safer and more efficient. It lets you focus on the cooking.

Having a tidy cooking station is key for a simple hibachi chicken recipe. Here are some tips to set it up:

  • Gather all the necessary ingredients and equipment within reach.
  • Clear a large, flat surface for cooking and food preparation.
  • Ensure good ventilation to prevent the buildup of smoke and fumes.

Setting Up Your Cooking Station

Think about your kitchen’s layout and the tools you’ll need. A quick chicken hibachi recipe needs a big skillet or wok. Make sure you have enough space to move around.

Safety Considerations

Always put safety first when cooking, especially with high heat and sharp objects. Keep a fire extinguisher nearby. Never leave your cooking station alone.

By following these tips, you’ll be ready to make a delicious simple hibachi chicken recipe. It’s sure to impress your family and friends.

IngredientQuantity
Chicken breast1 pound
Vegetable oil2 tablespoons
Soy sauce1 tablespoon

The Perfect Chicken Hibachi Marinade

To make a real hibachi chicken recipe, a great marinade is key. The marinade makes the chicken tender and full of flavor, just like homemade chicken hibachi. It should mix sweet, sour, and savory tastes.

When making a marinade for chicken hibachi, choose ingredients that enhance the chicken’s natural taste. Soy sauce, sake, and sugar are must-haves. They give the chicken a deep, savory flavor, just like in authentic hibachi recipes.

  • 1/2 cup soy sauce
  • 1/4 cup sake
  • 2 tablespoons sugar
  • 2 cloves garlic, minced
  • 1 tablespoon grated ginger

Mix these ingredients well, then add the chicken. Let it marinate for at least 30 minutes. This lets the flavors soak into the meat.

A top-notch marinade is crucial for a tasty hibachi chicken recipe. Soy sauce, sake, and sugar make a marinade that’s both tasty and tenderizing. Your homemade chicken hibachi will be a hit with this marinade.

Step-by-Step Chicken Hibachi Recipe

To make a tasty chicken hibachi recipe, start by preparing the chicken. Marinate it in soy sauce, garlic, and ginger. You can use pre-cut chicken breast or thighs for an easy recipe. Next, prepare the hibachi chicken and vegetables. Use bell peppers, onions, and mushrooms for a colorful mix.

Preparing the Chicken

Choosing the right chicken is key for a great hibachi recipe. You can pick chicken breast or thighs. Marinate it in soy sauce, garlic, and ginger for at least 30 minutes. This adds a rich flavor to the chicken.

Vegetable Preparation

For the hibachi chicken and vegetables, pick colorful veggies like bell peppers, onions, and mushrooms. Slice them thinly and set aside. Using pre-cut veggies can also make the recipe easier.

For more recipe ideas, check out chicken pita recipe websites. They offer easy and tasty recipes. By following these steps, you can make a delicious chicken hibachi recipe for any event.

Cooking Sequence

To cook the chicken hibachi, heat a large skillet or wok over medium-high heat. Add the marinated chicken and cook until it’s browned and cooked through. Then, add the vegetables and cook until they’re tender. Serve hot, garnished with sesame seeds and soy sauce.

Plating Instructions

To plate the chicken hibachi, place the cooked chicken and vegetables on a platter or individual plates. Garnish with sesame seeds, soy sauce, and green onions. Serve with steamed rice or noodles for a full meal. By following these steps, you can create a delicious chicken hibachi recipe for any occasion.

Mastering Hibachi Cooking Techniques

To master quick chicken hibachi, practice and refine your cooking skills. Achieving a perfect sear on chicken is key. Use a hot skillet and cook each piece separately to ensure even cooking.

Cooking chicken to the right temperature is also vital. This makes your best chicken hibachi recipe both tasty and safe. A food thermometer helps you get the chicken to the perfect internal temperature.

Here are some tips for a simple hibachi chicken recipe:

  • Use a mix of oil and butter for extra flavor
  • Make sure the chicken stays juicy and tender by not overcooking it
  • Try different seasonings and sauces to find your favorite

By following these tips and practicing, you’ll soon make delicious quick chicken hibachi dishes. They’ll impress your family and friends.

Tips for Mastering Hibachi CookingDescription
Achieve the perfect searUse a hot skillet and don’t overcrowd it
Cook to the right temperatureUse a food thermometer to ensure safety and quality
Experiment with seasonings and saucesFind your favorite combinations to add flavor to your dish

Creating Signature Hibachi Sauces

To make your authentic hibachi chicken recipe stand out, you need the right sauces. We’ll look at three key sauces: Yum Yum Sauce, Ginger Sauce, and Teriyaki Glaze. These are essential for a homemade chicken hibachi experience.

Yum Yum Sauce Recipe

This sauce is a must-have for chicken hibachi recipe. It’s a mix of mayonnaise, ketchup, and spices. Here’s what you’ll need:

  • 1/2 cup mayonnaise
  • 1/4 cup ketchup
  • 1 tablespoon soy sauce
  • 1 tablespoon rice vinegar

Ginger Sauce

This sauce gives your authentic hibachi chicken recipe a nice kick. It’s made with fresh ginger, garlic, and soy sauce. Here’s what you’ll need:

  • 1/2 cup soy sauce
  • 1/4 cup rice vinegar
  • 2 tablespoons grated ginger
  • 1 tablespoon garlic, minced

Teriyaki Glaze

This sweet and savory sauce is perfect for your homemade chicken hibachi. It’s a mix of soy sauce, sugar, and vinegar. Here’s what you’ll need:

  • 1/2 cup soy sauce
  • 1/4 cup sugar
  • 2 tablespoons rice vinegar

These sauces will elevate your chicken hibachi recipe. They’ll give you a truly authentic hibachi chicken recipe experience.

Side Dishes to Complement Your Chicken Hibachi

When serving hibachi chicken and vegetables, the right side dishes make a big difference. A good meal has a mix of flavors, textures, and temperatures. For a quick chicken hibachi dinner, try a few simple sides that match the best chicken hibachi recipe.

Some popular side dish options include:

  • Hibachi Fried Rice: a mix of cooked rice, veggies, and seasonings
  • Hibachi Vegetables: stir-fried veggies like bell peppers, carrots, and broccoli
  • Miso Soup: a Japanese soup with miso paste, dashi, and tofu

Customizing Your Side Dishes

To make your side dishes unique, try different seasonings and ingredients. For instance, add soy sauce or sesame oil to your Hibachi Fried Rice. Serving various sides creates a complete and enjoyable meal. It highlights the tastes of hibachi chicken and vegetables.

Common Mistakes to Avoid When Making Chicken Hibachi

Trying to make chicken hibachi at home can be tricky. It’s easy to make mistakes that can mess up the dish. Knowing these mistakes helps you make a tasty homemade chicken hibachi.

Common errors include overcooking the chicken and using bad ingredients. Not balancing the flavors is another mistake. To avoid these, follow a good recipe and prepare each part carefully.

Here are some tips to fix common problems:

  • Use a thermometer to ensure the chicken is cooked to a safe internal temperature.
  • Choose fresh, high-quality ingredients to ensure the best flavor.
  • Taste and adjust the seasoning as you go to balance the flavors.

By avoiding these mistakes, you can make a delicious homemade chicken hibachi. It will be as good as your favorite restaurant’s.

Variations and Customization Options

Chicken hibachi recipes are super versatile. You can change them to fit your taste, making them great for everyone. Want something spicy or low-carb? You can easily tweak a traditional recipe to make it your own.

Spicy Hibachi Chicken

For those who love a bit of heat, spicy hibachi chicken is perfect. Just add red pepper flakes or sriracha to your recipe. Try different hot sauces to find your favorite. Balance the spice with soy sauce or ginger for a complete flavor.

Low-Carb Hibachi Options

Watching carbs? No worries, you can still enjoy hibachi chicken. Swap rice or noodles for cauliflower rice or zucchini noodles. Focus on the chicken and veggies, which are low in carbs. A few tweaks can make your favorite recipe low-carb and just as tasty.

Conclusion: Mastering the Art of Homemade Chicken Hibachi

Exploring authentic chicken hibachi shows us how to make this tasty Japanese dish at home. With the right techniques and recipes, you can become a pro at making it. Follow the steps and use the right tools and ingredients to bring the vibrant flavors of a hibachi chef to your kitchen.

Perfecting homemade chicken hibachi is all about mastering cooking techniques and trying out different marinades and sauces. It’s also about finding the right mix of ingredients. Feel free to add your own twist to the recipes. This way, you can make the dish your own and enjoy endless possibilities.

Keep exploring and learning as you cook chicken hibachi. Take pride in your creations and enjoy the process. With each dish, you’ll get better and make meals more special for your family and friends. Happy cooking!

FAQ

What is the origin of chicken hibachi?

Chicken hibachi comes from Japan. It’s a dish made with chicken, veggies, and a tasty sauce. It’s cooked on a special griddle called a hibachi.

What equipment do I need to make chicken hibachi at home?

You’ll need a big skillet or wok, a cutting board, and utensils. Make sure your kitchen is well-ventilated and follow safety rules while cooking.

What are the key ingredients for an authentic chicken hibachi recipe?

For real chicken hibachi, use the right chicken, hibachi seasonings, and fresh veggies. A good marinade is key to flavoring the chicken.

How do I prepare my workspace for hibachi-style cooking?

Get your workspace ready by setting up your cooking station. Have all ingredients and tools within reach. Follow safety tips to avoid accidents.

What is the perfect chicken hibachi marinade?

The best marinade for chicken hibachi has soy sauce, rice vinegar, sesame oil, garlic, and ginger. This mix gives great flavor.

What are the key steps for making chicken hibachi?

To make chicken hibachi, prepare the chicken and chop veggies. Cook them in a specific order for the best taste and texture. Don’t forget to garnish and serve with the right sides.

What are some common mistakes to avoid when making chicken hibachi?

Avoid overcooking the chicken and using low-quality ingredients. Make sure to balance the flavors well. Stick to the recipe and technique for the best results.

Can I customize my chicken hibachi dish?

Yes, you can make chicken hibachi your own. Try spicy or low-carb versions by adding different ingredients and flavors.